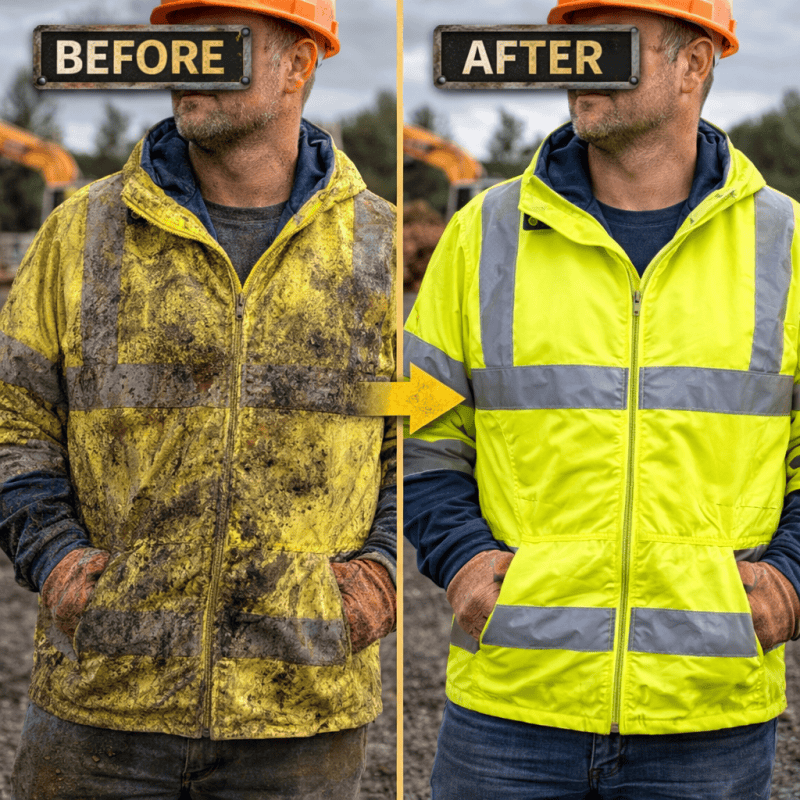
Picture this: it’s 5:30 AM, your crew is already on site, and trucks are reversing, machinery is moving, visibility is low, and everyone is technically “wearing hi-vis clothing.” But here’s the uncomfortable truth: a jacket caked in grime, oil, and UV-faded dye may satisfy the dress code while completely failing to meet the safety standard.
That vest has been through a dozen hot washes with the wrong detergent, fluorescent dyes faded, and reflective tape starting to peel. It still looks like a high-visibility vest, but it no longer performs like one.
Below, we give you a complete, step-by-step method for cleaning hi-vis clothing the right way, preserving reflective strips, protecting fluorescent fabric, and keeping your gear fully compliant with EN ISO 20471 and ANSI/ISEA 107 standards, wash after wash after wash.
Key Highlights
- Dirty or faded gear can reduce detection distance by up to 50%
- Hot water and fabric softener can permanently destroy reflectivity
- Most garments lose certified performance after 25–30 washes
- Improper laundering is one of the fastest ways to void compliance
- Correct high-visibility jacket care significantly extends lifespan
This Isn’t Just Laundry: Here’s Why Proper Hi-Vis Care Is a Safety Issue
The U.S. Bureau of Labor recorded 123,160 nonfatal “contact with object or equipment” injuries in private construction in 2020. According to the CDC’s NIOSH division, struck-by incidents remain a leading cause of construction fatalities and compromised visibility is a contributing factor. Dirty or faded gear can cut detection distance by up to 50%, while properly maintained high-visibility safety apparel can make workers visible from up to 1,280 ft, according to OSHA.
Standards exist to prevent this risk. EN ISO 20471 compliance (international) and ANSI ISEA 107 laundry requirements (U.S.) define minimum brightness and reflectivity thresholds. When contamination or improper cleaning of hi-vis clothing drops performance below those limits, the garment is no longer compliant PPE.
The market reflects the importance: the global hi-vis apparel sector is valued at $1.81B in 2024 and projected to reach $2.70B by 2030, driven by stricter safety regulations. Most garments are engineered for roughly 25–30 wash cycles, making every wash a factor in long-term safety.
Don’t Skip This: Pre-Wash Preparation That Actually Protects Your Gear
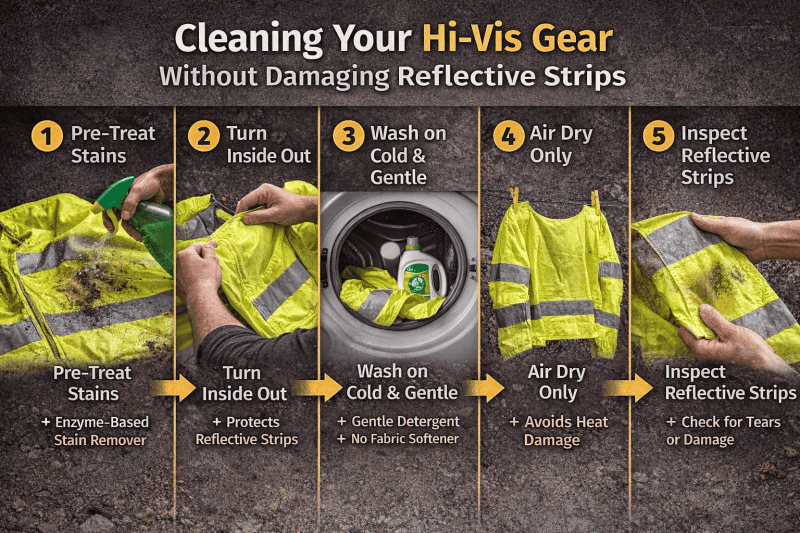
Most long-term damage to hi-vis apparel happens before the wash cycle starts. A few minutes of preparation dramatically improve the cleaning of hi-vis clothing and preserve EN ISO 20471 compliance.
Pre-wash checklist:
- Read the care label: Follow temperature and handling limits (often ≤ 30 °C) to maintain EN ISO 20471 performance.
- Inspect for damage: Check reflective tape, fluorescent panels, and seams; washing damaged gear accelerates failure.
- Close all fasteners: Zip, button, and secure Velcro to reduce snagging and abrasion.
- Turn inside out: Protects the outer fluorescent fabric and reflective strips from friction.
- Wash separately: Avoid denim, canvas, or heavy workwear that can cause abrasion.
- Pre-treat stains: Treat grease, paint, and heavy soil before washing to prevent permanent setting.
Step-by-Step: How to Wash Hi-Vis Clothing Without Wrecking It
Once your garment is prepped, the wash itself is straightforward as long as you follow the right settings. Here’s what each variable means for your gear.
1. Choose the Right Detergent: It’s More Important Than You Think
Detergent choice is a major and often ignored factor in cleaning hi-vis clothing. Many standard products contain Optical Brightening Agents (OBAs), which make fabrics appear brighter while gradually degrading fluorescent dyes. A garment may look clean but fall below EN ISO 20471 compliance luminance requirements.
Best practice:
- Use a mild, OBA-free detergent
- Prefer liquid over powder (powder residue can reduce retroreflective strip care performance)
- Choose enzyme-based formulas safe for technical fabrics to remove sweat and organic stains
| Detergent Type | OBA-Free? | pH Level | Hi-Vis Safe? | Notes |
| Mild liquid (e.g., Woolite, Nikwax) | Yes | Neutral | ✅ Best choice | Gentle on fluorescent dyes & retroreflective tape |
| Standard laundry powder | Often No | Alkaline | ⚠️ Use with caution | OBAs temporarily boost brightness, then degrade fluorescence |
| Biological enzyme cleaner | Varies | Neutral–Acidic | ✅ Good for stains | Check label; enzyme action is safe on most hi-vis fabrics |
| Bleach-based cleaner | No | High Alkaline | ❌ Never use | Permanently destroys fluorescent dyes; delaminates tape adhesive |
| Fabric softener/conditioner | N/A | Varies | ❌ Never use | Coats retroreflective glass beads, slashing nighttime reflectivity |
| Detergent with OBAs | No | Varies | ❌ Avoid | Causes false brightness that masks underlying fluorescence loss |
2. Use Cold Water: Fluorescent Dyes Start Fading at 40°C
Temperature is a primary cause of premature failure in cleaning hi vis clothing. Fluorescent dyes begin to degrade above 40 °C, while higher temperatures soften the adhesive that bonds reflective tape, leading to lifting and delamination, often permanently.
Best practice:
- Default to 30 °C (cold wash safety gear)
- Only use 40 °C if the care label explicitly allows it
- Never exceed label limits
- Select a delicate/synthetic cycle to reduce agitation and spin stress on the retroreflective strip care
| Cycle | Temperature | Spin Speed | Best For | Reflective Tape Impact |
| Delicate / Gentle | Cold (30°C / 86°F) | Low | All hi-vis vests & jackets | ✅ Safest – minimal mechanical stress |
| Synthetics | Cold–Warm (30–40°C) | Medium | Polyester hi-vis workwear | ✅ Safe if strictly under 40°C |
| Normal / Cotton | Warm–Hot (40–60°C) | High | Heavy cotton workwear only | ⚠️ Risk of tape delamination at 50°C+ |
| Hot Wash | Hot (60°C+) | High | Not suitable for hi-vis | ❌ Destroys fluorescence & tape adhesion |
3. Load Size Matters More Than You’d Expect
Overloading prevents proper tumbling and creates friction, the primary cause of wear during cleaning hi vis clothing. Instead of moving freely, garments rub against each other, accelerating damage to fluorescent fabric care surfaces and retroreflective strip care elements.
Best practice:
- Wash in small, light loads
- Split large batches across multiple cycles
- Pair only with lightweight, smooth fabrics
- Avoid heavy or abrasive items
When in doubt, wash hi-vis garments alone
How to Remove Every Common Hi-Vis Workwear Stain
Use this reference table to match your stain type to the correct pretreatment, then wash as directed.
| Stain Type | Pretreatment Method | Step-by-Step Action | Washing Instruction |
| Grease & Oil | Degreasing dish soap (e.g., Dawn) | Apply dish soap directly; gently work in with fingers or soft brush; leave 15–20 min; rinse cold | Gentle cycle, 30°C, OBA-free detergent |
| Collar Ring / Sweat | Baking soda paste or enzyme pre-treater | Mix baking soda + water into paste; apply; leave 20–30 min; OR apply enzyme cleaner 30 min; rinse | Gentle cycle, 30°C, OBA-free detergent |
| Mud / Dirt | Allow to dry fully; then dry-brush | Never scrub wet mud; dry completely; brush off bulk with a soft cloth; pre-treat residue with enzyme cleaner | Gentle cycle, 30°C, OBA-free detergent |
| Tar | Manufacturer-approved solvent | Test solvent on a hidden area first; apply carefully; blot, don’t rub; ventilate area; do not use on tape | Gentle cycle, 30°C post-solvent |
| Paint (wet) | Rinse immediately with cold water | Flush under cold running water quickly; blot with a clean cloth; apply a mild enzyme pre-treater | Gentle cycle, 30°C, OBA-free detergent |
| Paint (dried) | Specialist textile paint remover | Test on hidden area; apply remover; leave per instructions; blot carefully; never apply acetone to reflective tape | Gentle cycle, 30°C post-treatment |
| Oil-based chemical | Manufacturer-approved degreaser | Blot excess with a cloth; apply degreaser to the fabric panel only (not tape); rinse thoroughly with cold water | Gentle cycle, 30–40°C |
One non-negotiable rule: never apply any solvent, including acetone, nail polish remover, or petroleum-based degreaser, directly to retroreflective tape. These solvents dissolve the glass bead coating that creates retroreflection, and the damage is permanent.
The Drying Stage Is Where Most People Accidentally Ruin Their Hi-Vis Gear
Even after proper cleaning, hi vis clothing, and incorrect drying can quickly undo the benefits. Heat and UV exposure degrade fluorescent dyes and weaken reflective tape adhesion, directly impacting fluorescent fabric care and retroreflective strip care.
i. Air Drying — Best Practice
Air drying eliminates heat damage.
Recommended method:
- Hang immediately on a wide hanger
- Use a cool, dry, well-ventilated indoor space
- Avoid heat sources
This preserves brightness, prevents tape delamination, and maximises compliant lifespan.
ii. Low-Heat Tumble Drying — Only If Necessary
If machine drying cannot be avoided:
- Use the lowest heat setting (≤ 40 °C)
- Choose Delicate/Air cycles
- Remove while slightly damp
- Finish drying on a hanger
High heat is a leading cause of reflective tape failure and shrinkage.
iii. Avoid Direct Sunlight
Prolonged UV exposure causes gradual dye fading, even without heat.
Safer options:
- Dry in shade
- Dry indoors with airflow
- Avoid prolonged sun exposure
Repeated sun-drying can reduce brightness below EN ISO 20471 compliance levels before the garment reaches its rated wash lifecycle.
Common Mistakes & How to Avoid Them
These are the most common care errors that compromise hi-vis safety gear before its time, often without any visible warning signs until the damage is already done.
| Common Mistake | What It Does to Your Hi-Vis | What to Do Instead |
| Using bleach | Permanently destroys fluorescent dyes; weakens tape bonding | Use OBA-free mild liquid detergent only |
| Adding fabric softener | Coats’ retroreflective glass beads reduce nighttime visibility significantly | Never add fabric softener. Period. |
| Washing in hot water (50°C+) | Fluorescent dyes fade; tape adhesive softens and lifts; tape delamination begins | Use cold water – 30°C maximum |
| Overloading the machine | Garments bunch and abrade each other; reflective strips get scratched | Wash in small, light loads only |
| Skipping stain pretreatment | Grease and paint set permanently under machine washing heat | Always pre-treat stains before washing |
| Using OBA detergents | Creates false brightness that hides real fluorescence degradation | Choose OBA-free, pH-neutral detergents |
| Drying in direct sunlight | UV radiation fades fluorescent dyes rapidly, even after one drying session | Dry in shade or indoors with airflow |
| Tumble drying on high heat | Tape delamination, shrinkage of base fabric, and dye fading | Tumble dry on the lowest setting or air dry |
Beyond the Wash: Maintenance Habits That Keep Hi-Vis Gear Compliant for Longer
Great hi-vis clothing care doesn’t start and end at the washing machine. What you do between, how you store, inspect, and rotate your gear has an equally significant impact on its service life and EN ISO 20471 compliance status.
1. Rotate Your Gear
Using two sets reduces wear on each garment and ensures a clean backup. Since most hi-vis items are rated for about 25–30 washes, rotation significantly extends usable life.
2. Inspect Weekly
Routine checks help preserve retroreflective strip care and visibility.
Look for:
- Reflective tape cracking, peeling, or lifting
- Faded or greyed fluorescent fabric care panels
- Tears, fraying, or holes reduce coverage
- Persistent stains that dull brightness
Even minor tape delamination can sharply reduce reflectivity.
3. Store It Properly
Improper storage degrades gear even when unused.
Best practices:
- Hang on wide hangers (do not fold)
- Keep in a cool, dry space
- Avoid sunlight, heat, and chemicals
Folding creates crease points where reflective tape can crack over time.
4. Track Wash Cycles
Hi-vis garments degrade gradually, not suddenly.
Simple tracking guidelines:
- ~20 washes: Plan replacement
- ~25 washes: Increase inspections
- ~30 washes: Retire the garment
Fluorescent fading may be invisible but still fall below safety thresholds, making wash tracking one of the most reliable workwear cleaning tips for compliance.
How Do You Actually Know When Hi-Vis Clothing Needs to Be Replaced?
Even with proper high visibility jacket care and careful cleaning, hi-vis clothing safety apparel does not remain compliant forever. Fluorescent dyes fade, coatings wear down, and reflective performance declines with use.
Replace the garment if you notice any of the following:
- Damaged reflective tape: Cracking, peeling, or lifting edges indicate failure of retroreflective strip care. Delamination worsens quickly and reduces nighttime visibility.
- Faded fluorescent fabric: If the background looks dull, grey, or olive instead of bright yellow/orange, it may no longer meet EN ISO 20471 compliance luminance requirements. Compare with a new item if unsure.
- Excessive wash cycles: Most hi-vis garments are rated for about 25-30 washes. Proactive replacement is safer than waiting for failure.
- Permanent staining: Stubborn contamination reduces the effective fluorescent area, undermining fluorescent fabric care performance.
- Physical damage: Tears, holes, or seam failures compromise both visibility coverage and structural integrity under ANSI ISEA 107 laundry and ISO standards.
Pro Tips: 6 Things That Extend Your Hi-Vis Gear’s Compliant Life
|
FAQs
How do you clean high-visibility clothing?
Turn inside out, pre-treat stains, and machine wash on a gentle cycle at ≤ 30 °C using a mild OBA-free detergent. Do not use bleach or fabric softener. Air dry in shade or tumble dry low only if necessary to preserve fluorescent fabric care and retroreflective strip care.
Can you put hi-vis clothing in a washing machine?
Yes. Use a delicate/synthetics cycle, cold water, low spin, small loads, and keep fasteners closed. Separate from heavy or abrasive items to avoid damage when washing hi-vis vest garments.
Can reflective material be washed?
Yes. Reflective tape is designed for laundering. Use cold water, a gentle cycle, and mild detergent. Avoid bleach, softener, high heat, and solvents to maintain retroreflective strip care performance.
How do you wash clothes with graphics on them?
Turn inside out, wash cold on a gentle cycle with mild detergent, and avoid heat above 40 °C. High temperatures cause cracking, peeling, and print delamination.
How do I get rid of a ring around the collar on hi-vis gear?
Pre-treat with baking soda paste or degreasing dish soap, let sit 15–30 minutes, rinse, then wash using standard cleaning hi vis clothing guidelines (cold water, gentle cycle).
How often should hi-vis clothing be washed?
Wash whenever visibly soiled. Heavy-duty roles may require weekly cleaning; lighter use can be less frequent. Monitor the typical 25–30 wash lifespan and perform regular inspections to maintain EN ISO 20471 compliance.
Your Hi-Vis Gear Works Hard. Make Sure You’re Taking Care of It.
High-visibility clothing is not a commodity; it’s certified personal protective equipment with a measurable, finite service life. Every hot wash, every wrong detergent, every dryer cycle on the wrong setting chips away at the fluorescent dye integrity and retroreflective tape adhesion that keep workers visible and alive.
The good news: none of this is complicated.
- Cold water
- Gentle cycle.
- OBA-free detergent.
- Air dry inshade.
- Inspect weekly.
That’s the formula. Follow it consistently, track your wash cycles, and replace garments proactively when they approach their service life and your hi-vis clothing will perform exactly as EN ISO 20471 and ANSI/ISEA 107 require, every shift, every site, every time.
At National Safety Gear, we stock a full range of certified high-visibility clothing from Class 2 vests to Class 3 full jackets built to the highest standards and designed to be cared for exactly as this guide describes. Because the best hi-vis gear is only as good as the person maintaining it.
Resources & References
All statistics and compliance information in this guide are sourced from authoritative organisations:
- U.S. Bureau of Labor Statistics – Nonfatal Occupational Injuries and Illnesses (2020)
- CDC NIOSH – Struck-by Incidents in Construction
- OSHA – High-Visibility Safety Apparel Fact Sheet
- ISO – EN ISO 20471 Standard for High-Visibility Clothing
- ANSI/ISEA 107 Standard Overview
- Grand View Research – High Visibility Clothing Market Report
Working in low-light conditions, whether on roadways, construction sites, or outdoor environments, presents a serious safety concern. High-visibility safety clothing is one of the most effective ways to ensure workers remain visible, even in the darkest conditions. The goal of high-visibility apparel is simple- minimize the risk of accidents as workers are made visible, especially in environments with limited visibility. This guide offers practical advice on understanding, selecting, and maintaining high-visibility safety clothing to ensure your safety and compliance with industry regulations.
What is High Visibility Safety Clothing?
High-visibility safety clothing is apparel designed to enhance workers’ visibility, especially in low-light or high-risk environments. These garments are made from fluorescent safety clothing materials that are highly visible in daylight and are complemented with retroreflective tape to ensure that workers are visible even in low-light and nighttime conditions. High-vis vests, jackets, and pants are the most common types of hi-vis apparel worn in sectors such as construction, transportation, and roadside work. Their primary function is to improve visibility.
The regulatory framework governing high-visibility clothing includes guidelines from organizations such as ANSI (American National Standards Institute) and CSA (Canadian Standards Association), which specify materials, designs, and reflective areas to ensure compliance and safety.
Why High Visibility Clothing Matters in Low-Light Conditions
Low-light conditions increase the risk of accidents in high-risk work zones, such as construction sites and roadways, where PPE, or roadway worker gear, is used. According to the NSC, roadway work zone safety is especially critical, with 102,000 crashes and 44,240 injuries reported in 2020 alone. These incidents underscore the need for hi-vis clothing in traffic zones to improve worker visibility and reduce accidents.
For workers exposed to vehicles or machinery, wearing reflective safety gear can make a life-saving difference. Reflective clothing can be seen from up to 500 feet away, compared to just 55 feet with dark clothing, according to the National Highway Traffic Safety Administration (NHTSA). This improved visibility at a distance drastically reduces the likelihood of collisions, particularly for those working near moving vehicles or heavy equipment.
Key Standards and Regulations
To ensure worker safety, ANSI 107 and CSA Z96 establish the key compliance standards for high-visibility safety clothing. These standards categorize garments into classes and types based on their reflective capabilities and suitability for different environments. They also provide the guidelines needed for compliant work uniforms that meet the OSHA requirements and FHWA MUTCD (Federal Highway Administration Manual on Uniform Traffic Control Devices) for roadway worker gear.
ANSI/ISEA 107 Classes and Types
The ANSI 107 standard is essential for ensuring that garments provide sufficient visibility across various environments. It defines three classes of visibility garments-
- Class 1- Suitable for workers in low-risk environments, such as parking lots or warehouses, where vehicle speeds are low.
- Class 2- Designed for workers in environments where higher visibility is needed, such as traffic control zones. A class 2 vest or safety jacket is standard in this category.
- Class 3- The highest level of visibility, suitable for workers in high-risk environments, such as highway construction zones or night-time operations. A class 3 jacket provides the most robust protection.
In addition, the standard includes types of high-visibility apparel- Type O, R, and P, which designate the environment and performance characteristics of the garments. Type O is for off-road environments, Type R is for roadway work, and Type P is for professional-grade apparel suitable for work in a variety of conditions.
CSA Z96-15 Compliance
In Canada, CSA Z96-15 is the national standard for high-visibility apparel. This standard includes similar classes and ensures that fluorescent yellow-green and fluorescent orange are the primary colors for high-vis safety gear. Compliance with CSA Z96-15 is essential for workers exposed to struck-by hazards, particularly those near moving vehicles.
OSHA and FHWA Requirements
The OSHA requirements and the FHWA MUTCD mandate that high-visibility clothing be worn in work zones, particularly on federal-aid highways. These guidelines ensure that workers are visible to vehicle operators from a distance, reducing the likelihood of accidents. For example, high-visibility apparel with retroreflective tape is required for highway work zone safety under the FHWA MUTCD.
Types of High-Visibility Apparel
High-visibility safety gear comes in various forms, tailored to the needs of the job site. The right garment will depend on the level of exposure to traffic, weather conditions, and the nature of the work environment.
Safety Vests & Traffic Vests
High-vis vests, such as class 2 vests, are essential for workers in moderate-risk environments, such as traffic control zones. These vests often feature retroreflective tape and are made of breathable hi-vis material, providing a balance of visibility and comfort.
Jackets, Parkas & Rainwear
For workers exposed to the elements, safety jackets and rainwear with reflective elements ensure visibility in adverse weather. Waterproof hi-vis jackets and parkas are designed for high-risk environments, offering durability and waterproof hi-vis protection in harsh weather.
Shirts, Sweatshirts & Tops
Hi-vis shirts and hi-vis sweatshirts are standard in construction and roadside work, where they provide an additional layer of visibility while being comfortable enough for long work hours. Many models incorporate moisture-wicking fabrics to ensure comfort and reduce sweat build-up.
Pants, Overalls & Coveralls
Hi-vis pants and coveralls are crucial in low-light conditions to ensure full-body visibility. These garments, made from durable fabrics, often include retroreflective tape on the legs to enhance visibility, especially for those working in or near moving vehicles.
Headwear & Accessories
Head protection, such as hi-vis caps or hard hats with integrated reflective safety gear, is vital for workers in high-risk areas. These accessories ensure that workers’ heads are visible, which is critical for avoiding accidents in construction zones.
Gloves & Hand Protection
Safety gloves made from high-visibility materials ensure workers’ hands remain visible, especially when directing traffic or operating machinery. Gloves may also include reflective elements for added visibility.
Women ’s-Specific Hi-Vis Gear
Women’s safety gear is designed with ergonomic and fit considerations, offering improved comfort and functionality for female workers. These garments include breathable hi-vis fabrics and retroreflective tape placements suited to women’s body types.
Key Features to Look For
When selecting high-visibility safety clothing, several features influence performance and comfort.
Fluorescent Fabrics & Colors
The most effective fluorescent safety clothing is made from high-visibility materials such as fluorescent yellow-green and fluorescent orange. These colors provide the best visibility in daylight and are commonly used in high-vis vests and safety jackets.
Retroreflective Tape & Striping
Retroreflective tape is the key to making garments visible at night or in low-light conditions. This tape reflects light toward its source, ensuring workers are visible even at distances of several hundred feet.
Breathability & Moisture Wicking
Breathable hi-vis fabrics are essential for comfort, especially in hot and humid conditions. Moisture-wicking materials help keep workers dry and comfortable, reducing fatigue and preventing overheating.
Waterproofing & Weather Resistance
For workers exposed to the elements, waterproof hi-vis clothing is necessary. Hi-vis rainwear and jackets protect workers from rain and wind, while still ensuring they remain visible in low-light conditions.
Durability & Reinforcements
Durable workwear is essential for ensuring long-lasting performance in harsh environments. Reinforced areas in high-stress zones, such as knees and elbows, provide added protection and extend the garment’s lifespan.
Technological Innovations (LED, Smart Sensors)
LED safety vests and LED-integrated jackets are on the cutting edge of visibility technology. These garments incorporate innovative features that enhance visibility and add functionality to traditional reflective safety gear.
Fit, Comfort & Female-Specific Design
For maximum protection and comfort, fit and comfort are essential factors when choosing high-vis clothing. Women’s safety gear is specifically designed to offer comfort and proper fit, ensuring maximum protection without compromising on mobility.
How to Choose the Right Hi-Vis Clothing
Choosing the proper hi-vis clothing depends on several factors, including the required visibility distance, the environment in which the worker will be operating, and the level of risk associated with the job. Considerations should include garment class (e.g., class 2 vest or class 3 jacket), type of work (e.g., construction PPE or roadway worker gear), and environmental factors such as weather.
Care & Maintenance
Proper care and maintenance of high-visibility safety clothing are essential to preserving its visibility and ensuring compliance with standards. Over time, reflective safety gear can lose its effectiveness if not properly maintained, thereby reducing workers’ safety in high-risk environments. To maintain performance, garments should be washed regularly according to the manufacturer’s instructions, ideally with a mild detergent and without fabric softeners. The retroreflective tape and fluorescent safety clothing materials must also be inspected for wear and tear after each use, especially for those working in harsh conditions.
Garments that show signs of fading or damage, such as torn seams, broken zippers, or missing reflective strips, should be replaced immediately to ensure continued improvement in visibility. Breathable hi-vis materials may lose their effectiveness if not kept clean, as dirt and grime can obstruct the fabric’s breathability and cause discomfort for the wearer. Additionally, waterproof hi-vis clothing should be checked for leaks or wear at seams and zippers to maintain weather resistance. Following proper maintenance guidelines ensures that hi-vis clothing retains its protective properties, keeping workers visible and compliant with OSHA requirements and ANSI 107 standards.
Industry Trends & Innovations
The future of hi-vis clothing is being shaped by groundbreaking innovations that improve both safety and comfort. The increasing use of innovative hi-vis gear is one such development, in which technologies like LED-integrated jackets are being incorporated to enhance visibility. These jackets feature built-in LED lights that can be activated in low-light environments, offering an added layer of visibility for workers, especially in hazardous areas where light conditions fluctuate. These innovations significantly improve vehicle detection and struck-by hazard visibility at longer distances.
Furthermore, the demand for breathable hi-vis fabrics continues to rise. As work environments become more varied, from construction zones to outdoor events, the need for moisture-wicking and lightweight materials has grown. Workers can now stay comfortable without sacrificing visibility, as these materials improve airflow and help regulate body temperature during long shifts. Another trend gaining momentum is sustainability in the manufacturing of fluorescent safety clothing, with companies shifting toward eco-friendly materials. These sustainable fabrics not only help reduce environmental impact but also provide durability and flexibility to workers. Overall, safety gear technology continues to evolve, driving innovative high-vis clothing solutions across industries.
Frequently Asked Questions
1. What are the OSHA requirements for high-visibility clothing?
OSHA requirements for high visibility clothing mandate the use of hi-vis apparel in construction and roadway work zones to reduce accidents. These regulations ensure that workers are visible from a distance, especially in high-risk environments.
2. Are pink hi-vis vests legal?
Under ANSI 107, pink hi-vis vests are not compliant for PPE use. Only fluorescent yellow-green, fluorescent orange, and red are approved colors for work zone safety apparel.
3. Is it illegal to wear high-vis?
It is not illegal to wear hi-vis clothing, but OSHA and FHWA require that workers in specific environments wear compliant work uniforms to ensure jobsite visibility.
4. Is high-visibility clothing considered PPE?
Yes, high-visibility clothing is considered PPE, especially in environments where workers are exposed to struck-by hazards from vehicles or machinery.
5. What are the different types and classes of high-visibility clothing?
The ANSI 107 standard classifies hi-vis clothing (1, 2, 3) and types (O, R, P) based on the environment and required visibility.
Wrapping Up
Ensuring jobsite visibility is crucial in reducing accidents and fatalities. Whether you are looking for traffic control vests, waterproof hi-vis, or compliant work uniforms, investing in the proper high-visibility safety clothing is essential. Browse through National Safety Gear today to find out all about our range of ANSI107-compliant hi-vis apparel, including safety jackets, high-vis pants, and reflective safety gear. Ensure your team’s safety and stay compliant with the latest regulations and standards.
If we put the wrong FR garment on the job, we can still end up with preventable burns, failed audits, and downtime. FR clothing ratings exist for one reason: to match the protection level to the hazard level we actually face, using test-backed numbers and clear label language.
Arc flash risk is not rare. OSHA notes that five to ten arc flash explosions may occur daily in the U.S., and when electrical incidents turn serious, the consequences can be enormous, from long recoveries to major claims. Eaton summarizes reported injury cost ranges that can reach into the millions, depending on severity and circumstances.
Below, we break down how FR clothing ratings work, how to read labels quickly, and how to choose gear that aligns with your hazard assessment and compliance requirements.
Keyhights
- FR clothing ratings (cal/cm²) show how much arc-flash energy a garment can withstand.
- Arc Rating is based on ATPV or EBT, and the lower value becomes the official rating.
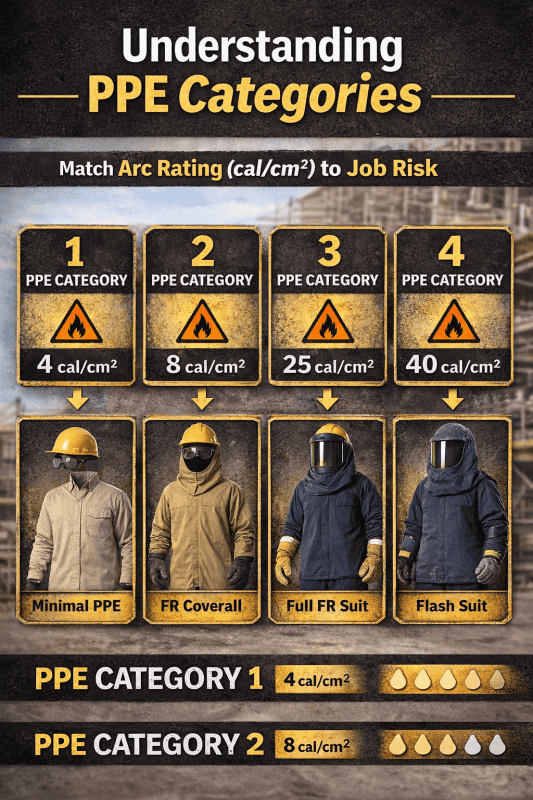
- NFPA 70E PPE Categories require minimum arc ratings: CAT 1 (4), CAT 2 (8), CAT 3 (25), CAT 4 (40).
- NFPA 2112 applies to flash fire protection, while ASTM F1506 covers arc-rated FR clothing requirements.
- Choosing the right rating prevents severe burns, supports compliance, and reduces total incident costs.
What Are FR Clothing Ratings?
FR (flame-resistant) means the fabric is designed to self-extinguish when the ignition source is removed, reducing burn injury severity. But “FR” alone is not a complete selection tool for electrical work. For electrical hazards, we rely on an Arc Rating, expressed in cal/cm².
Arc Rating (cal/cm²): What It Means
An Arc Rating is the value assigned to a fabric or fabric system that describes how it performs when exposed to an electrical arc. It indicates the level of incident energy the material can withstand before the onset of a second-degree burn.
The arc rating is expressed in calories per square centimeter (cal/cm²) and is derived from either the Arc Thermal Performance Value (ATPV) or the Energy Breakthrough Threshold (EBT), using the lower or limiting value when fabric break-open occurs.
The formal test method and calculation framework are defined under ASTM F1506 – Standard Performance Specification for Flame-Resistant and Electric Arc Rated Protective Clothing, which outlines how arc-rated garments must be evaluated and labeled.
ATPV and EBT: the two test endpoints
Arc ratings come from standardized testing (commonly ASTM F1959, referenced across industry education and manufacturer resources). In practice, we’ll usually see the result shown as a single number on a label, but behind that number is either:
- ATPV (Arc Thermal Performance Value), or
- EBT (Energy Break-open Threshold).
The key point: the garment’s Arc Rating is the number we compare to the incident energy from our arc flash assessment.
Arc Thermal Performance Value (ATPV) vs. Energy Break-open Threshold (EBT)
These terms confuse a lot of buyers, so here’s the straightforward way to think about them:
- ATPV is the incident energy where the test predicts a 50% probability of the onset of a second-degree burn (based on heat transfer through the fabric system). ASTM defines ATPV using that 50% probability concept.
- EBT is the incident energy where the fabric system is likely to break open, which can expose skin directly to heat and flame. ASTM notes that arc rating is derived from ATPV or EBT, particularly when break-open occurs below the ATPV value.
What gets reported on the label?
The Arc Rating is typically the lower of the two endpoints for that material system. That’s why two garments can look similar, yet have different arc ratings.
Do we choose ATPV-rated over EBT-rated?
Not based on the acronym. We choose based on:
- the Arc Rating number (cal/cm²), and
- whether the garment system (including layers) was tested and labeled appropriately.
PPE Categories (CAT 1–4) and Arc Rating Requirements
NFPA 70E uses PPE categories as a simplified way to align PPE selection with common task/hazard profiles. Many training providers and safety education resources summarize the minimum arc ratings by category consistently.
A commonly referenced breakdown is:
| PPE Category | Minimum Arc Rating | Typical Use Case (high-level) |
| CAT 1 | 4 cal/cm² | Low-risk tasks with limited exposure |
| CAT 2 | 8 cal/cm² | Moderate exposure potential |
| CAT 3 | 25 cal/cm² | Significant hazard areas |
| CAT 4 | 40 cal/cm² | Extreme arc-flash risk tasks |
Important: CAT values aren’t “power levels” we guess at. We assign PPE based on a hazard/risk assessment (incident energy analysis or table method, where permitted).
i. CAT 1 – Minimum 4 cal/cm² for low-risk work
CAT 1 is often used where arc flash exposure exists but is relatively lower. Minimum 4 cal/cm² is the baseline commonly cited for CAT 1.
ii. CAT 2 – Minimum 8 cal/cm² for moderate-risk exposure
CAT 2 commonly starts at 8 cal/cm². This is also where we often see requirements for arc-rated face protection begin in many programs.
iii. CAT 3 – Minimum 25 cal/cm² for significant hazard areas
CAT 3 steps up substantially to 25 cal/cm² minimum. At this level, layering systems becomes more common, and we need to be sure the system is compliant.
iv. CAT 4 – Minimum 40 cal/cm² for extreme arc-flash risks
CAT 4 is typically 40 cal/cm² minimum. This is where selecting the right head, face, hand, and body protection as a full system is critical.
Flash Fire Ratings and NFPA 2112 Compliance
Arc flash isn’t the only FR scenario. Many industrial environments involve flash fire risk, especially where flammables exist.
NFPA 2112 is a major benchmark for flash fire protective garments. Manufacturers and hazard-education resources commonly describe the core pass/fail requirement using the ASTM F1930 instrumented manikin test:
- 3-second exposure, and
- pass/fail criteria of a maximum 50% total body burn (predicted).
What we should look for on labels:
If flash fire protection is part of the hazard assessment, we want to see NFPA 2112 compliance/certification language on the garment label or documentation package.
Inherently FR vs. FR-Treated Fabrics
We’ll see two broad approaches in FR workwear. Neither is universally “best.” The right choice depends on the work, the laundering reality, and the lifecycle cost.
Inherently FR
- FR protection is built into the fiber structure.
- Protection does not “wash out” because it’s not a surface treatment.
- Often selected for long service life programs and frequent laundering environments.
FR-Treated
- Starts with a base fabric (often cotton blends) and applies chemical treatment to achieve FR performance.
- Can deliver comfort and value, but selection should consider laundering instructions and service life, since performance depends on maintaining the fabric system as designed.
Procurement tip: whichever type we choose, we verify:
- the relevant standard(s) on the label,
- the arc rating (if electrical hazards apply), and
- whether the garment is approved for the laundering method we actually use.
How to Read FR Clothing Labels
A good FR label helps us confirm compliance in seconds. Here’s what we teach teams to look for:
-
Standard(s) referenced
- For electrical/arc-rated garments, labels often reference ASTM performance and labeling requirements. ASTM F1506 specifically includes minimum performance requirements and garment labeling requirements.
- For flash fire, look for NFPA 2112 references where applicable.
- For electrical/arc-rated garments, labels often reference ASTM performance and labeling requirements. ASTM F1506 specifically includes minimum performance requirements and garment labeling requirements.
-
Arc Rating (cal/cm²)
- This is the number we compare to the incident energy.
- This is the number we compare to the incident energy.
-
PPE Category (CAT)
- Often shown as CAT 1–4 when the garment is marketed for NFPA 70E category selection.
- Often shown as CAT 1–4 when the garment is marketed for NFPA 70E category selection.
-
Fiber content and construction notes
- Fabric blend, weight, and sometimes stitching/thread notes.
- Fabric blend, weight, and sometimes stitching/thread notes.
-
Care instructions
- Follow them. Improper laundering can reduce protection or garment life.
- Follow them. Improper laundering can reduce protection or garment life.
-
Warnings about add-ons
- OSHA notes that logos and name tags made from non-flame-resistant material can adversely affect the arc rating or FR characteristics. That means heat transfers, patches, and trims should be vetted, not assumed.
Are FR Clothes Worth the Investment?
Yes, when we consider total risk and total cost.
1) Avoiding severe injury costs
Arc flash incidents can lead to extremely high medical and recovery costs. Eaton summarizes that burn injury costs can range broadly, reaching very high levels in severe cases.
Even one prevented life-altering injury changes the math immediately.
2) Compliance and penalty exposure
OSHA publishes maximum penalty amounts that apply after January 15, 2025, updated annually for inflation.
For organizations, FR PPE is part of a defensible compliance posture when hazards are present and cannot be eliminated through engineering or administrative controls.
3) Reduced downtime and claim friction
When PPE matches the hazard assessment, we reduce:
- lost time injuries,
- incident investigations that reveal PPE gaps,
- workers’ comp and insurance friction.
Bottom line: FR clothing is not about buying “expensive shirts.” It’s about buying down risk where the downside is catastrophic.
Choosing the Right FR Workwear
Selection is easiest when we follow a repeatable decision path:
Step 1: Start with the hazard assessment
For electric utility and similar work, OSHA describes requirements to:
- assess for flame/electric-arc hazards,
- estimate available heat energy from arcs, and
- ensure clothing is appropriate and, where required, has an arc rating greater than or equal to the available heat energy.
Step 2: Match the Arc Rating to incident energy
- If the incident energy is 6 cal/cm², CAT 2 minimum (8 cal/cm²) may be the practical baseline.
- If the incident energy is 18 cal/cm², CAT 3-level garments or tested systems may be required, depending on your policy margins.
Step 3: Build the system, not just the shirt
Arc flash protection is not only torso fabric. We align:
- shirt + pants or coverall
- outerwear (if used)
- face/hood protection
- gloves, head protection, and footwear requirements
Step 4: Use layering intentionally
Layering can add protection, but only when we manage it correctly:
- Base layers should be appropriate for the hazard environment.
- Outer layers must meet the required arc rating.
- Avoid non-compliant add-ons that compromise performance (patches, trims).
Step 5: Choose durability and comfort that people will wear
In procurement, “best” often means:
- consistent sizing,
- durable seams and closures,
- fabrics that stay comfortable across seasons,
- stock availability for replacements.
This is where dependable FR workwear programs matter: the gear has to be worn correctly, every shift, not just specified on paper.
FAQs
1. Is CAT 3 FR better than CAT 2?
CAT 3 handles higher incident energy than CAT 2 (commonly 25 cal/cm² minimum vs 8 cal/cm² minimum). But “better” depends on the job. If the hazard assessment calls for CAT 2, wearing CAT 3 can add heat stress and cost without improving safety outcomes for that task. We aim for adequate protection with workable comfort.
2. Is FR clothing worth the money?
Yes. Arc flash incidents can occur daily, and the downside is severe. OSHA cites alarming incident frequency ranges, and industry sources summarize injury costs that can be extremely high. Proper FR selection also supports compliance and reduces organizational exposure.
3. What are the FR ratings?
For electrical hazards, the key is Arc Rating (cal/cm²) derived from ATPV or EBT concepts. For simplified selection, many programs align garments to PPE Categories CAT 1–4 with minimum arc ratings (4, 8, 25, 40 cal/cm²). For flash fire, look for NFPA 2112 compliance tied to manikin testing limits.
4. Who makes the best FR clothing?
There are many reputable brands (Carhartt, Bulwark FR, Ariat, Wrangler FR, Tyndale and others). “Best” is the brand that consistently delivers:
- the correct standards and arc ratings,
- durable construction for your job conditions,
- sizing and comfort workers accept, and
- Reliable replenishment for your program.
5. Is CAT 2 the same as FR?
No. FR describes flame resistance. CAT 2 is a PPE category that typically requires arc-rated FR apparel meeting a minimum arc rating threshold (commonly 8 cal/cm²).
A garment can be FR for flash fire and still not be appropriate for a CAT-based arc flash program unless it has the right arc rating and labeling.
Align the Rating With the Risk
When we understand FR clothing ratings, we move from assumption to verification. Arc ratings expressed in cal/cm² are not marketing claims. They are lab-tested performance values that must be compared directly to the calculated incident energy from an arc flash assessment. If the incident energy exceeds the garment’s arc rating, the protection gap is real.
PPE categories, arc ratings, and labeling standards work together as decision tools. The arc rating tells us the energy threshold that the fabric system can withstand. The PPE category helps standardize minimum protection levels for task-based selection. The garment label confirms compliance with the applicable performance standard. Each piece plays a role in controlling arc flash risk.
FR clothing is not one-size-fits-all protection. It is part of a layered safety system that depends on accurate hazard analysis, correct selection, and consistent enforcement. When the rating aligns with the risk and the system remains intact, we reduce burn severity, support compliance, and strengthen operational safety across the site.
We’re here to solve one problem that shows up on real job sites every day: too many women are still expected to stay visible and protected in PPE that does not fit. Fit is not about looks. Fit is about keeping reflective striping in the right place, reducing snag hazards, moving freely, and staying focused on the task instead of tugging at a vest that rides up.
Women are still a smaller share of the construction workforce, but the number is growing. Recent workforce reporting puts women at about 10.8% of U.S. construction workers. And the PPE fit gap is well documented. In a major survey on women’s PPE, only 29% of respondents said their PPE was designed for women, and 57% said their PPE sometimes or significantly hampers their work.
If you’re buying for yourself, we’ll walk through how to choose the right female safety vest. If you’re buying for a crew, we’ll also cover how to standardize sizing, compliance, and fit testing so people actually wear what you issue.
Key Highlights
- Proper fit reduces snag hazards and prevents fabric from catching on tools, rebar, or machinery.
- Correct sizing keeps reflective tape fully visible, improving driver and equipment operator awareness.
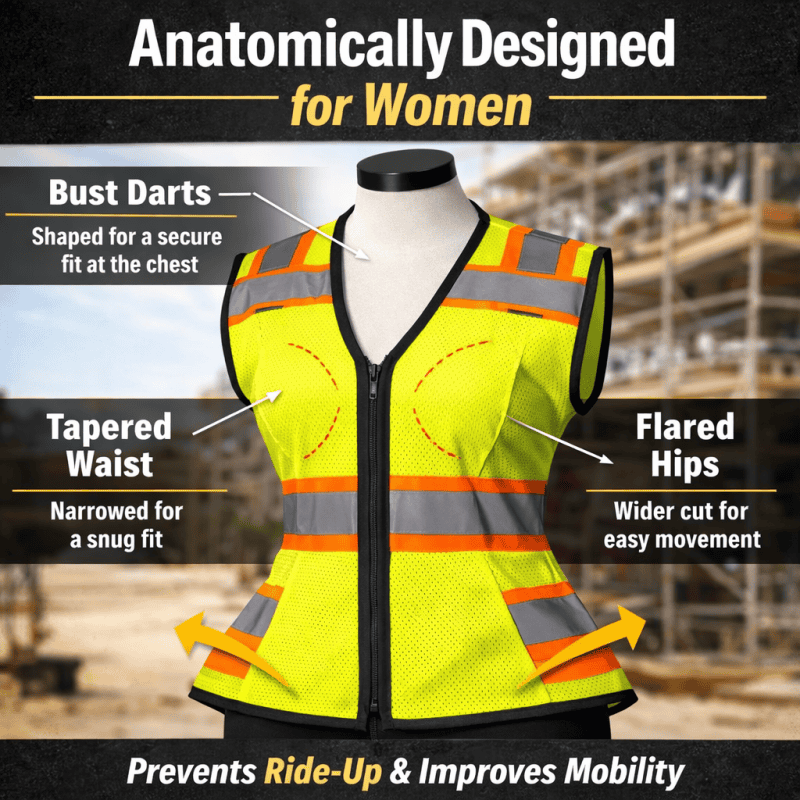
- Women’s vests include tapered waists, hip room, and bust shaping to prevent ride-up and gapping.
- Fit is part of compliance, not a personal preference.
- Women-specific designs improve safety, mobility, and long-term wear compliance.
Why Female-Specific Safety Vests Matter
When a vest fits poorly, the risks are practical and immediate:
- Snag and catch hazards: Loose armholes, excess torso length, and bunching fabric can catch on rebar, ladders, tool belts, and machinery edges.
- Reduced visibility: If the vest rides up, folds, or hangs open, reflective tape can be partially blocked, dirty faster, or sit in the wrong place for drivers and equipment operators to see.
- Lower mobility and slower work: Restriction at the bust or hips can limit reach and twisting. Overly long vests can bump into belts and pockets, especially when climbing or bending.
- Lower compliance: If PPE is uncomfortable, workers adjust it constantly or stop wearing it when supervisors are not nearby.
This is not hypothetical. The “one size does not fit all” issue is repeated across industries, with women reporting day-to-day work impact from ill-fitting PPE.
OSHA’s Personal Protective Equipment standard (29 CFR 1910.132) requires employers to assess workplace hazards, provide appropriate PPE, and ensure it fits properly to protect workers. That means fit is not a comfort preference. It is part of hazard control and regulatory compliance.
Key Features of a Female Safety Vest
A woman’s safety vest is not just a smaller man’s vest. The best designs account for how vests sit on the body while bending, climbing, lifting, and wearing layers.
1. Tapered Waist and Flared Hips
A tapered waist with room at the hips helps prevent two common problems:
- Ride-up when moving: Straight-cut vests can climb up the torso when the hips and thighs move forward, like when stepping up onto equipment.
- Bunching at the beltline: A woman’s cut that follows the waist and hip shape sits flatter, so reflective tape stays more consistently visible.
Look for shaping that keeps the front panels lying flat when you sit, squat, or climb stairs. If the hem flips up easily, the vest is probably too straight through the hips.
2. Bust Accommodations and Torso Length
Women’s vests that actually work on site usually include at least one of these:
- Darts or seams at the bust so the front panel does not pull open.
- Stretch panels that add room without making the whole vest oversized.
- Shorter or proportioned torso length so the vest does not collide with harness belts, tool belts, or hip pockets.
The goal is simple: the vest should close comfortably without tension lines and without leaving the bottom edge so long that it interferes with tools and movement.
3. Adjustability and Closure Types
Closures and adjusters matter more than people expect.
i. Zipper closures
- More secure, less likely to pop open.
- Better at keeping reflective tape aligned.
- Usually preferred for high-activity tasks and windy conditions.
ii. Hook-and-loop (Velcro-style)
- Quick on and off.
- Easier to adjust than changing layers.
- Can collect dust and debris over time, and may lose grip.
iii. Side tabs and elastic panels
- Useful for dialing in fit at the waist and hips.
- Helpful when you rotate between a t-shirt, hoodie, and winter jacket.
If you’re buying for a crew, we usually recommend zip-front options for consistent closure, plus side adjusters to support a wider range of body shapes.
4. Material and Reflectivity Standards
Most female safety vests come in a few common material types:
- Breathable mesh: Best for heat and high exertion. Great airflow, lighter feel.
- Polyester solid fabric: More durable, often better for pockets and abrasion.
- Hybrid mesh and solid: A strong choice when you need both ventilation and pocket structure.
For compliance, high-visibility garments in the U.S. typically align with ANSI/ISEA 107 performance requirements, which cover things like photometric performance, minimum amounts of background and reflective material, and placement rules.
Many employers use ANSI/ISEA as the benchmark for hi-vis selection when workers are exposed to vehicle traffic.
Color note: ANSI/ISEA 107 recognizes specific high-visibility background colors (commonly fluorescent yellow-green and fluorescent orange-red, depending on garment type and class). That’s why “fashion colors” can be a compliance issue.
5. Pockets and Practical Features
Pockets are not a bonus; they change how people work. Useful features include:
- Reinforced lower pockets for tape measures, gloves, or small tools.
- Radio mic tabs and D-rings for accessories (not fall protection).
- Clear ID/badge windows for controlled sites.
- Separate pen slots and notebook pockets for inspectors and supervisors.
If you carry tools daily, choose a vest with reinforced pocket edges and stitching. Thin mesh vests can tear if pockets are overloaded.
Understanding ANSI/ISEA 107 Standards
ANSI/ISEA 107 is the main consensus standard used for high-visibility safety apparel performance in the U.S. It defines requirements for things like visibility materials and their placement to improve worker conspicuity in day and night conditions.
Here’s a practical way to think about the classes:
| ANSI/ISEA 107 Class | Best for | Typical work examples |
| Class 1 | Lowest traffic exposure, more separation from vehicles | Warehouses with limited vehicle interaction, low-speed internal areas |
| Class 2 | Near traffic or moving equipment, higher visual demand | Roadside utility work, construction zones, and manufacturing yards |
| Class 3 | Highest visibility needs, complex backgrounds, higher speeds | Highway work, flagging, night work near traffic, high-risk roadside operations |
Your site policy, DOT requirements, and task risk level usually determine the minimum class. When in doubt, safety managers often choose the higher class for mixed tasks, especially for crews that move between yard work and roadside exposure.
How to Choose the Right Female Safety Vest
Step 1 – Measure for Fit
Measurements take five minutes and prevent weeks of discomfort. Use a flexible tape measure and measure over a thin shirt.
1) Bust
- Measure around the fullest part of the bust.
- Keep the tape level and snug, not tight.
2) Waist
- Measure at the natural waist, usually above the belly button and below the ribs.
3) Torso length
- Measure from the top of the shoulder (near the base of the neck) down to where you want the vest hem to end.
- If you wear a tool belt or harness, measure to a point that will not interfere.
Fit targets we use on-site
- You should be able to zip or close the vest fully without pulling.
- You should be able to reach overhead without the hem lifting into your ribs.
- The vest should sit flat, not tent out at the chest, and not bind at the hips.
If you’re between sizes, decide based on layers. If you work outdoors and wear heavy winter gear, size for the thickest layer you’ll realistically wear.
Step 2 – Determine Your ANSI Class
Match the class to the hazard exposure, not the job title.
- More vehicle exposure, higher speed roads, night work, or complex backgrounds usually mean Class 3.
- General construction zones, utility work, manufacturing yards, or areas with moderate equipment movement often align with Class 2.
- Low-speed, low-exposure areas may allow Class 1, depending on site rules and risk levels.
For procurement teams, we recommend documenting the class decision within your hazard assessment so the requirement stays consistent with your overall safety program and aligns with OSHA’s personal protective equipment standards under 29 CFR 1910 Subpart I.
Step 3 – Consider Environment and Layers
Your environment changes what “fits” means.
i. Hot conditions
- Prioritize mesh or hybrid ventilation.
- Avoid heavy pocket loads that trap heat.
ii. Cold conditions
- Make sure armholes are large enough to layer over insulated jackets.
- Look for adjustable sides so the vest still sits close enough to keep striping visible.
iii. Wet conditions
- Consider hi-vis outerwear instead of a vest over a rain jacket, so the reflective tape is not hidden by water-shedding layers.
If your role crosses seasons, it’s often smarter to have two options: a lightweight mesh vest for summer and a heavier, more structured vest or hi-vis jacket for winter.
Step 4 – Fit Testing and Compliance Checks
Before issuing a new vest program, do a quick field trial.
i. On-person checks
- Walk, squat, climb a ladder, and sit in a vehicle seat.
- Confirm the vest stays closed and does not ride up.
- Check for rubbing at the underarm and neck.
ii. Visibility checks
- Make sure reflective tape is not covered by tool belts, harness straps, radios, or long hair.
- Verify the vest is not so loose that the front hangs open.
iii. Maintenance checks
- Confirm the vest’s reflective elements and background material stay clean and intact. Dirt and wear reduce visibility performance over time.
Top Trends and Innovations in Women’s Hi-Vis Workwear
Women’s PPE is finally moving away from “shrink and pink” and toward functional design. The strongest trends we’re seeing include:
- Stretch fabrics and smarter patterning: Stretch zones that support bending and reaching without turning the vest into a bag.
- Hybrid builds for comfort plus durability: Mesh where you need airflow, solid fabric where you need pockets, and abrasion resistance.
- Integrated FR options for mixed hazards: More women’s hi-vis products are available with flame-resistant performance for environments where flash fire or arc hazards are part of the risk profile. (Always match FR selection to your site’s hazard analysis and required standards.)
- Better sizing systems: Brands are improving women’s size grading so mid sizes are not just scaled-down men’s cuts.
The market is pushing in this direction for a reason. Demand for protective clothing continues to increase globally, with major industry analysis estimating the industrial protective clothing market at approximately USD 18.35 billion in 2022, with strong projected growth. See the full data in this industrial protective clothing market report.
FAQs
1. What is the difference between a man’s and a woman’s safety vest?
Women’s vests are typically designed with a tapered waist, more hip room, and bust shaping, plus proportioned torso length and adjusters that reduce bunching. The practical result is less ride-up, fewer open gaps at the chest, and more consistent reflective tape placement during movement.
2. Why is a properly fitting safety vest so important for women?
Proper fit reduces snag hazards, keeps reflective striping visible, improves mobility, and cuts distractions. Fit also drives compliance; people are far more likely to wear PPE correctly when it feels right, and surveys show ill-fitting PPE can hamper work performance.
3. Are pink safety vests OSHA-compliant?
If a site requires ANSI/ISEA 107 hi-vis compliance, pink is not typically used as an approved primary background color under the standard’s recognized high-visibility colors. Pink may appear as an accent on compliant garments, but for regulated high-vis needs, stick with ANSI-labeled vests in the correct fluorescent background color and class.
4. How do we choose the right size and type of women’s safety vest?
Measure bust, waist, and torso length, then use the manufacturer’s size chart. Size for your normal working layers and choose the ANSI class based on exposure to traffic or equipment. If you’re buying for a team, run a short on-site fit trial and standardize the winning models.
5. Do safety vests have a weight capacity?
Most safety vests are not rated for a specific weight capacity like lifting gear. They are designed for visibility and light carry.
6. How much weight can we safely carry in vest pockets?
There’s no universal number. We suggest keeping pocket loads light enough that the vest does not sag, pull open, or shift reflective tape. For heavier carry, use a tool belt or a dedicated tool vest designed for load distribution, and follow the manufacturer’s guidance.
7. Can we attach a lanyard or fall-arrest device to a safety vest?
A standard hi-vis vest is not fall protection and should not be used as an anchor or harness component. If you need fall protection, use a certified harness system and wear hi-vis in a way that keeps the harness functional and visible.
Fit Drives Visibility. Visibility Drives Safety.
When women’s hi-vis and FR workwear fit correctly, safety performance improves. Reflective striping stays in position. Movement is unrestricted. Workers spend less time adjusting gear and more time focused on the task.
The bottom line is simple: visibility is only effective when the garment fits, closes, and performs the way the standard intended. Choose deliberately. Measure carefully. Standardize intelligently. That is how we improve safety outcomes for every worker on site.
Workplace protection is often reduced to a single phrase, but the reality is more nuanced. Understanding the difference between personal protective equipment, safety clothing, and broader safety wear is critical for compliance, risk reduction, and worker confidence. While both categories aim to reduce exposure to hazards, they differ in scope, regulation, and application. This distinction matters because incorrect selection or misuse can leave gaps in protection, increase injury risk, and create compliance issues during audits or inspections.
Across industrial, construction, manufacturing, and utility environments, employers are expected to align protection with specific hazards through proper hazard assessment, thoughtful PPE selection, and ongoing PPE training. With the global PPE market valued at USD 80.36 billion in 2022 and projected to grow steadily through 2030, investment in the right gear is no longer optional; it is a baseline expectation. Clarifying how industrial safety clothing, safety garments, and regulated PPE work together helps organizations protect people while maintaining productivity and legal compliance.
What Is Personal Protective Equipment (PPE)?
Personal protective equipment refers to devices and gear designed to protect workers from specific workplace hazards that could cause injury or illness. Under OSHA PPE requirements, PPE is selected after identifying risks that cannot be eliminated through engineering or administrative controls. PPE serves as the last line of defense between the worker and potential harm, and it is governed by clear PPE standards covering selection, fit, use, and maintenance.
PPE includes protective eyewear, face shields, hearing protection, safety gloves, and steel-toe boots. Unlike general safety garments, PPE is directly tied to hazard exposure and must meet defined performance criteria. Employers are responsible for ensuring PPE is appropriate, properly fitted, and maintained throughout its service life. Failure to do so can result in injuries, lost workdays, and costly citations. In fact, workplace injuries remain a significant concern, with millions of non-fatal incidents reported annually, underscoring the importance of PPE as a foundational element of workplace safety programs.
Head, Eye, and Face Protection
Head, eye, and face protection is among the most recognized forms of PPE. Hard hats shield workers from falling objects, impact hazards, and electrical risks in construction and industrial settings. Protective eyewear, safety glasses, and goggles protect against flying debris, dust, chemical splashes, and radiant energy. Face shields provide additional coverage for tasks involving grinding, cutting, or exposure to chemical sprays.
These forms of PPE are essential across manufacturing, construction, and energy sectors, where eye and face injuries remain common. Consistent use, proper fit, and routine inspection are critical parts of PPE maintenance, ensuring that protective properties are not compromised over time.
Hand, Foot, and Hearing Protection
Hands, feet, and ears are frequently exposed to hazards, making their protection a core component of personal protective equipment programs. Safety gloves are designed to protect against specific risks, including chemical exposure, cuts, abrasions, and thermal hazards. Steel-toe boots protect against crushing injuries, punctures, and slips, and offer electrical hazard resistance in specific environments.
Hearing protection, like earplugs and earmuffs, reduces exposure to harmful noise levels that can lead to long-term hearing loss. Together, these forms of PPE support worker safety in environments ranging from heavy manufacturing to logistics and construction.
What Is Safety Clothing?
Safety clothing refers to body-worn garments designed to improve visibility, provide environmental protection, or reduce injury risk during routine work activities. Unlike PPE devices, safety garments often cover larger areas of the body and are integrated into daily workwear. Examples include high-visibility vests, flame-resistant clothing, chemical protective suits, and protective coveralls.
While safety clothing may fall under PPE regulations depending on the hazard, it is often categorized separately due to its garment-based design and extended wear time. Industrial safety clothing plays a crucial role in preventing accidents, particularly in environments with moving vehicles, electrical hazards, or chemical exposure. Protective clothing accounted for more than 35 percent of the PPE market revenue in 2023, reflecting strong demand across construction, utilities, oil and gas, and manufacturing sectors.
High-Visibility Apparel
High-visibility apparel is designed to make workers more noticeable in environments with moving vehicles, heavy equipment, or low-light conditions. ANSI ISEA 107 standards define performance requirements based on garment design, background material, and retroreflective coverage. Class 3 PPE clothing represents the highest level of visibility, requiring full torso coverage with sleeves and extensive reflective material for maximum conspicuity.
These garments are essential for roadway construction, rail operations, and emergency response, where workers face high-speed traffic and complex visual environments. Safety wear in this category reduces struck-by incidents and supports compliance with visibility regulations.
Flame-Resistant & Arc Flash Suits
Flame-resistant clothing and arc flash protection are critical in environments with fire or electrical hazards. These garments are engineered to self-extinguish, limiting burn severity and reducing injury risk. Arc flash protection suits are commonly used in utilities, electrical maintenance, and energy sectors, where exposure to high-energy electrical arcs can be life-threatening.
Standards governing these garments focus on thermal performance, durability, and coverage. Proper selection and care ensure that flame-resistant properties remain effective throughout the garment’s lifespan.
Chemical-Resistant Coveralls
Chemical protective suits and protective coveralls shield workers from hazardous substances, including liquids, vapors, and particulates. EN 13982-1 defines protection levels for particulate hazards, including Type 5 protective clothing, which is designed to be particle-tight against airborne solid particulates.
Chemical-resistant garments are classified into Types 1 through 6, each addressing different exposure scenarios. These garments are widely used in pharmaceutical manufacturing, chemical processing, and hazardous material response, where skin exposure can lead to serious health effects.
Cut-Resistant & Impact-Resistant Garments
Cut-resistant materials and impact-resistant fabrics are increasingly integrated into safety garments for industries such as manufacturing, warehousing, and glass handling. These garments protect against lacerations, blunt force trauma, and repetitive strain injuries. Materials such as engineered fibers and reinforced textiles protect without significantly restricting movement, supporting both safety and productivity.
Key Standards and Regulations
Standards and regulations provide the framework that defines how personal protective equipment and safety clothing must perform. Compliance with these standards ensures consistency, reliability, and legal defensibility across industries.
OSHA 29 CFR 1910.132
This regulation outlines general requirements for PPE, including hazard assessment, equipment selection, employee training, and employer responsibility for payment. It emphasizes that PPE must be appropriate for the identified hazards and maintained in a sanitary and reliable condition. OSHA’s eye and face protection standard remains one of the most frequently cited, highlighting ongoing compliance challenges and the need for better education and enforcement.
ANSI/ISEA 107 High-Visibility Standards
ANSI ISEA 107 establishes criteria for high-visibility vests and garments, defining Classes 1, 2, and 3, as well as specialized categories for roadway and public safety use. These standards ensure consistent visibility performance across environments, helping employers select the right level of protection based on traffic speed, work complexity, and lighting conditions.
EN 13982-1 Chemical Protective Clothing Types
EN 13982-1 focuses on protection against solid particulates and defines garment performance for hazardous environments. Understanding these classifications helps organizations select appropriate chemical protective suits and avoid under-protection in high-risk tasks.
How to Choose the Right Safety Clothing PPE
Selecting the right combination of PPE and safety clothing requires a structured approach that balances risk, comfort, and practicality.
Conducting a Hazard Assessment
A thorough hazard assessment identifies physical, chemical, electrical, and environmental risks present in the workplace. This process lays the foundation for effective PPE selection, ensuring protection aligns with actual exposure rather than assumptions.
Matching Garment to Hazard
Once hazards are identified, employers must match safety garments and PPE to those risks. This includes selecting industrial safety clothing with appropriate ratings, materials, and coverage for the task at hand. Misalignment between hazard and protection can render equipment ineffective.
Fit, Comfort, and Ergonomics
Proper fit and ergonomic design are critical for compliance and long-term use. Ill-fitting gear can cause discomfort, reduce mobility, and discourage consistent wear. Advances in garment construction now allow for protective performance without sacrificing comfort.
Maintenance and Replacement Guidelines
Routine inspection, cleaning, and timely replacement are essential components of PPE maintenance. Damaged or worn equipment can fail unexpectedly, increasing injury risk and undermining safety programs.
Industry Trends and Innovations
The safety industry continues to evolve, driven by technology, sustainability goals, and worker expectations.
Smart PPE and Wearables
Innovative PPE integrates sensors and connectivity to monitor environmental conditions, worker location, and physiological data. These tools support proactive safety management and real-time risk mitigation, particularly in high-hazard environments.
Sustainable and Eco-Friendly Materials
Sustainable PPE is gaining traction as manufacturers check out recycled fibers, low-impact production methods, and longer-lasting garments. These initiatives reduce environmental impact while maintaining protective performance.
Ergonomic Design Improvements
Ongoing ergonomic design improvements focus on reducing fatigue, improving mobility, and supporting extended wear. These innovations help bridge the gap between safety and productivity.
Frequently Asked Questions
What are examples of safety clothing PPE?
Examples of safety clothing PPE include high-visibility apparel, arc flash protection suits, chemical-resistant coveralls, garments made with cut-resistant materials, and steel-toe boots. These items are widely used across industrial and construction environments.
What is Class 3 high-visibility clothing?
Class 3 PPE clothing represents the highest visibility level under ANSI/ISEA 107, requiring garments that cover the torso and sleeves and feature extensive background and reflective material. It is intended for high-risk environments with fast-moving traffic or complex work zones.
What are the types of chemical protective clothing?
Chemical protective clothing is classified into Types 1 through 6, with Type 5 protective clothing designed to protect against airborne solid particulates. Each type corresponds to different exposure scenarios and protection levels.
Wrapping Up
Understanding the distinction between personal protective equipment, safety clothing, and safety wear is essential for building a reliable workplace safety strategy. PPE focuses on task-specific hazards, while industrial safety clothing provides broader, garment-based protection for daily operations. Together, they form a layered defense that reduces injury risk, supports compliance, and builds worker trust.
With work-related injuries costing the U.S. economy more than $170 billion annually, investing in the right combination of PPE and safety garments is both a safety priority and a sound business decision. The next step is sourcing dependable products from a knowledgeable supplier that understands standards, fit, and real-world applications.
For organizations ready to strengthen their safety programs, National Safety Gear offers a wide selection of compliant PPE and industrial safety clothing, along with expert guidance to help you protect your workforce with confidence.
On busy job sites and active roadways, visibility determines safety. When lightweight safety vests tear, fade, or fail after a few weeks, protection drops even though the risk doesn’t.
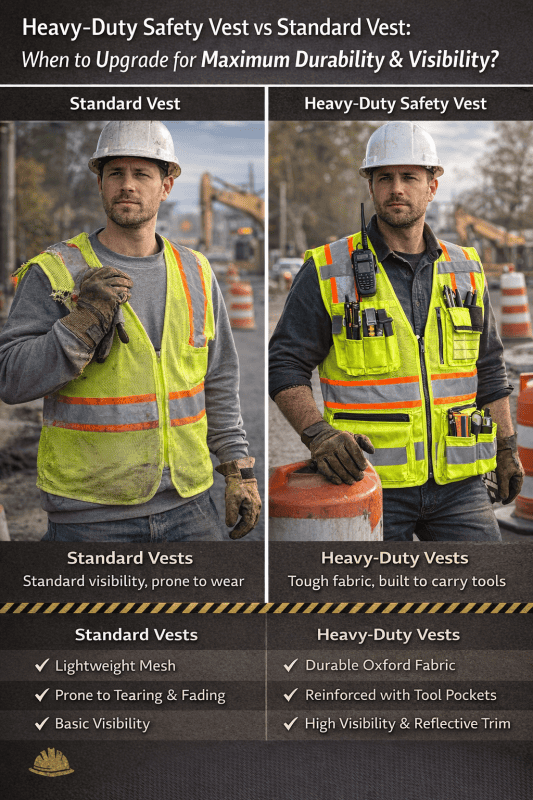
Standard vests may meet basic visibility requirements, but they often don’t hold up to daily wear, moving traffic, and active equipment. Heavy-duty safety vests are built for these conditions, offering greater durability, a better fit, and the ability to carry tools without failing.
If you’re carrying tools, working near moving vehicles, or replacing vests more often than you should, it’s worth asking a simple question. Are we wearing visibility gear that matches the risk we face every day? Knowing when to upgrade from a standard vest to a heavy-duty option can directly impact comfort, compliance, and most importantly, safety on the job.
Key Highlights
- Heavy-duty safety vests are built with stronger materials that resist tearing, fading, and daily abuse
- Standard vests focus on basic visibility but often fall short in durability and storage
- High-visibility gear plays a critical role in reducing struck-by incidents on active job sites
- Upgrading makes sense when you work near traffic, carry tools, or replace vests frequently
- The right vest supports safety compliance while staying comfortable through long shifts
Why Visibility and Durability Matter
Visibility on the job site is lifesaving. In 2022, 1,069 construction workers died on the job, more than in any other industry. A large share of these deaths were struck-by incidents, where workers were hit by vehicles or equipment. Between 2011 and 2015, over 800 construction workers died from struck-by injuries, with about 52% involving objects or equipment. In road work zones, roughly half of worker fatalities involve workers on foot being struck by vehicles or mobile equipment.
High-visibility safety vests dramatically increase detection distance up to 1,280 feet (about four football fields), giving drivers and equipment operators crucial time to react, especially in low-light or high-speed environments.
Durability matters just as much as visibility. PPE only protects workers if it stays intact and is worn consistently. Lightweight vests can tear, fade, or lose reflective tape, quickly becoming non-compliant or unusable. Heavy-duty safety vests are built to withstand daily wear, maintain visibility over time, and encourage consistent use.
Standard Safety Vests: Features & Limitations
Standard safety vests are low-cost, basic garments designed to meet minimum visibility requirements. They’re typically used for visitors, short-term tasks, or low-risk environments.
1. Construction & Design
- Lightweight polyester mesh for breathability, not durability
- Neon lime-yellow or orange background
- 2-inch silver reflective tape
- Common layout: two vertical shoulder stripes + one horizontal midsection stripe
- Usually meets ANSI Class 2
- Hook-and-loop (Velcro) or plastic snap closures
- Single-layer mesh with basic binding; no reinforced seams
2. Storage & Fit
- Little to no storage
- At most one small chest pocket
- Limited adjustability
- Loose fit may flap in the wind or snag on equipment
3. Cost
- $5–$10 per vest
- Ideal for temporary use or visitor wear
4. Durability Limitations
- Thin mesh tears easily
- Closures wear out quickly
- Reflective tape may peel or fade with washing or sun exposure
- Short lifespan under daily or heavy use
What Makes a Vest “Heavy Duty”?
A heavy-duty safety vest is designed for durability, load-bearing, and long-term use in demanding work environments. It goes far beyond basic visibility and functions as protective gear plus wearable storage.
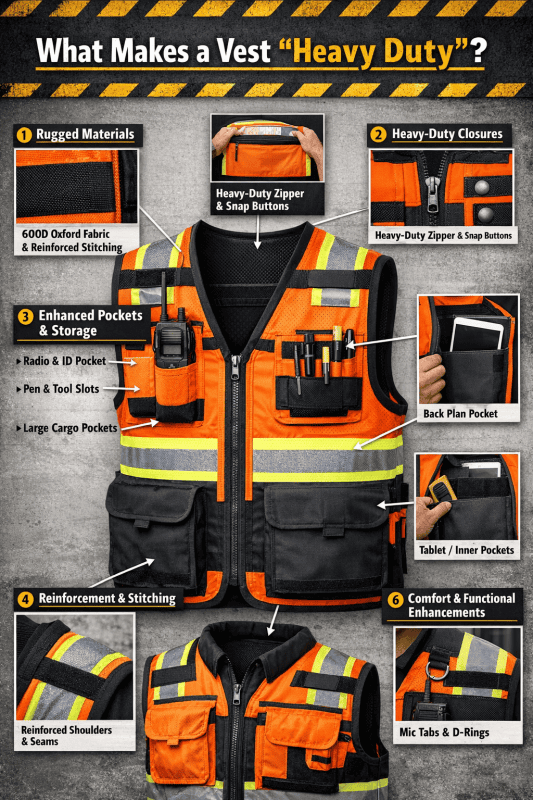
1. Rugged Materials
Heavy-duty vests use high-denier fabrics instead of lightweight mesh. Common materials include 300D or 600D Oxford polyester and solid polyester twill, especially in high-wear areas like the front and pockets. These fabrics resist abrasion and tearing, and support the weight of loaded pockets. Mesh, if used, is typically a thick utility mesh or combined with a solid backing. Reinforced stitching, binding, and webbing at stress points prevent premature failure.
2. Heavy-Duty Closures
Instead of basic Velcro, heavy-duty vests rely on full-length industrial zippers (often #5 or #8 gauge) or metal snap buttons. These closures stay secure in wind, traffic airflow, dirt, and mud, and won’t open under pocket load.
3. Enhanced Pockets & Storage
Storage is a defining feature. Heavy-duty (often “surveyor”) vests include multiple functional pockets, such as:
- Upper chest pockets (radio, ID window, or flap)
- Pen and tool slots
- Large front cargo pockets with flaps
- Interior pockets for tablets or clipboards
- Full-width back “plan pocket” with zipper
- Specialized holders for spray paint, water bottles, flagging tape, and keys
This allows workers to carry tools, plans, and gear without a separate tool belt.
4. Reinforcement & Stitching
Stress points like shoulders, edges, and pocket seams are reinforced with heavy binding, webbing, and double stitching or bartacks. Pocket interiors are often double-layered to prevent sharp tools from puncturing the fabric.
5. Load-Bearing Design
Heavy-duty vests are built to carry weight without sagging or tearing. Solid Oxford fronts support cargo pockets, while reinforced shoulders and yoke designs distribute load evenly. Some models include padded or quilted collars for comfort when fully loaded.
6. Comfort & Functional Enhancements
Despite their toughness, these vests prioritize wearability. Common features include:
- Solid front / mesh back for durability and airflow
- Adjustable sides (snaps or elastic) for a better fit
- Mic tabs, D-rings, or harness access points
- Two-tone designs (often with black panels) to hide dirt
Core Features of Heavy-Duty Safety Vests
Heavy-duty safety vests are built for rugged daily use, combining durable materials, secure closures, high-capacity storage, and all-day comfort far beyond standard mesh vests.
1. Material & Construction
Heavy-duty vests use a hybrid design rather than full mesh. Most feature a solid front panel made from 300D or 600D Oxford polyester or durable twill, paired with a mesh back for airflow. High-wear areas are reinforced with webbing, binding, and extra stitching at shoulders, edges, and pocket seams. Many designs include black or dark color-blocking on lower sections to hide dirt and extend service life.
2. Closure Systems
Instead of Velcro, heavy-duty vests use industrial-grade closures, typically full-length #5 or #8 zippers or metal snap buttons. These stay secure in wind, dust, and heavy use, with some models adding adjustable sides or breakaway points for fit and safety.
3. Pockets & Storage
Storage defines heavy-duty (often “surveyor”) vests. Most include 6–10+ reinforced pockets, such as:
- Large front cargo pockets
- Chest pockets for radios, pens, or ID
- Interior tablet/notebook pockets
- Full-width back plan pocket
- Specialized holders for spray paint, bottles, or flagging tape
Durable, double-layer pocket construction supports tool weight and often replaces the need for a tool belt.
4. Comfort Enhancements
Designed for long shifts, these vests feature padded necks/collars, mesh ventilation zones, and adjustable sides for a better fit. Extended sizing (M–5XL) allows layering while reducing snag risk.
Visibility & Compliance Standards
Upgrading to a heavy-duty safety vest does not reduce visibility. Most heavy-duty vests are designed to meet or exceed ANSI/ISEA 107 high-visibility requirements, just like standard vests.
- ANSI Class 1 (Type O – Off-Road)
- Lowest visibility level
- Minimal fluorescent material and reflective tape
- Intended for low-risk environments (warehouses, parking attendants)
- Traffic speed: under 25 mph
- Not suitable for construction or road work
- Heavy-duty vests rarely fall into Class 1
- ANSI Class 2 (Type R – Roadway)
- The most common and minimum standard for construction
- Required near traffic over 25 mph
- Minimum requirements:
- 775 sq in fluorescent background material
- 201 sq in retroreflective tape
- 775 sq in fluorescent background material
- Full vertical and horizontal reflective striping
- Common for road crews, utility workers, and job sites
- Most heavy-duty vests are Class 2 compliant
- ANSI Class 3 (Type R or P)
- Highest visibility level
- Required for traffic over 50 mph, night work, or poor visibility
- Designed for 360° visibility, including arm movement
- Visibility distance: 1,280 ft (¼ mile)
- Must include sleeves or be a vest-plus-sleeves/jacket system
- Used by highway workers, flaggers, and emergency responders
- Fluorescent & Reflective Requirements
- Fluorescent background colors: Lime-yellow or orange (daytime visibility)
- Retroreflective tape: Typically 2-inch silver
- Enhanced options include:
- Contrasting trim (“brilliant trim”)
- Segmented reflective tape for flexibility and breathability (still ANSI-compliant)
Comparing Top Heavy-Duty Vest Models
Heavy-duty safety vests vary by material strength, pocket layout, closure type, and compliance level. Below is a clear comparison of leading models used in construction and industrial work.
Key Model Highlights
- ML Kishigo Black Series 1515
- Material: Ultra-Cool™ polyester mesh with solid black bottom/trim
- Closure: Zipper
- Pockets: 2 cargo, 2 chest (ID + pencil), 2 interior
- ANSI: Class 2 (Type R)
- Best for: Professional look, dirt-hiding design, light-to-moderate tool carry
- Radians SV55 Heavy-Duty Engineer Vest
- Material: 300D Oxford solid front, mesh back
- Closure: #8 heavy-duty zipper
- Pockets: Radio pocket, pencil slots, 2 cargo pockets w/ grommets, 2 side can pockets, rear zip plan pocket, 2 inside tablet pockets
- ANSI: Class 2 (Type R)
- Notable: Padded neck, dual mic tabs, 2″ reflective tape with 1″ contrast trim
- Best for: Engineers, supervisors carrying plans and devices
- Radians SV59 Heavy-Duty Surveyor Vest
- Material: Mesh upper, solid twill lower; reinforced webbing
- Closure: Metal snap buttons (varies by version)
- Pockets: Large full-width back plan pocket, front cargo pockets, chest pockets, interior pockets
- ANSI: Class 2 (Type R) (also available in Class 1 black and Class 3)
- Best for: Contractors needing snap closures and maximum durability
- DeWalt DSV521 Heavy-Duty Vest (licensed by Radians)
- Material: Hi-vis mesh body, solid twill pockets
- Closure: Zipper
- Pockets: Radio/ID pocket, pencil pocket, cargo pockets, inside tablet pockets, full back panel pocket
- ANSI: Class 2 (Type R)
- Notable: D-ring harness pass-through, 2″ segmented reflective tape, dual mic tabs
- Best for: Workers using fall-protection harnesses
- GSS Safety 1715 Hyper-Lite (Black)
- Material: Smooth breathable black mesh, reinforced webbing
- Closure: Zipper
- Pockets: 2 large cargo pockets w/ grommets, 2 inside iPad-size pockets
- ANSI: Non-ANSI (enhanced visibility; roughly Class 1 equivalent)
- Best for: Non-roadway work where ANSI compliance isn’t required
Quick Comparison Table
| Vest Model | Material & Build | Storage Highlights | ANSI Class |
| Kishigo Black Series 1515 | Mesh + black reinforced bottom | 6 pockets, reflective trim | Class 2 (Type R) |
| Radians SV55 | 300D solid front, mesh back | Plan pocket, tablet pockets, can holders | Class 2 (Type R) |
| Radians SV59 | Mesh + solid twill, snap closure | Full-width back plan pocket | Class 2 (Type R) (also 1 & 3) |
| DeWalt DSV521 | Mesh body, solid pockets | Harness D-ring slot, segmented tape | Class 2 (Type R) |
| GSS 1715 (Black) | Reinforced black mesh | Cargo + iPad pockets | Non-ANSI |
How to Choose the Right Vest for Your Job
Use this checklist to select a heavy-duty safety vest that matches your work conditions, compliance needs, and daily tasks.
1. Work Environment
- High-speed roads/night work: Choose ANSI Class 3
- Construction & roadside work: ANSI Class 2 minimum
- Hot climates: Mesh panels, ventilated backs
- Brush, debris, rough surfaces: Solid fabric fronts (300D–600D)
- Special hazards: Look for FR, waterproof, or breakaway designs if required
- Color rules: Orange or lime, depending on industry (rail, airport, DOT)
2. Required ANSI Class
- Class 1 (Type O): Low-risk, off-road, < 25 mph (rare for construction)
- Class 2 (Type R): Standard for construction, traffic 25–50 mph
- Class 3 (Type R/P): High-speed roads 50+ mph, night or low visibility
Always check the ANSI/ISEA 107 tag before purchasing.
3. Storage Needs
Match pockets to what you actually carry:
- Radios → radio pocket + dual mic tabs
- Tablets/plans → inside tablet pocket + back plan pocket
- Tools/spray paint → cargo pockets, grommets, side can pockets
More pockets = more weight, so don’t overbuy.
4. Comfort & Fit
- Padded neck/shoulders for heavy loads
- Mesh backs for airflow
- Adjustable sides for layering
- Proper sizing for 8–10 hour shifts
5. Durability Features
- Fabric rating: 300D–600D Oxford or heavy twill
- Reinforced stitching, bar-tacked stress points
- #5 or #8 heavy-duty zippers or metal snaps
- Branded reflective tape (e.g., 3M)
- Grommets for drainage and tool tethering
6. Special Requirements
- Fall protection: D-ring harness pass-through
- Electrical or fire risk: Certified FR vest (NFPA / ASTM)
- Snag risk: Breakaway design
- Company policy: Color coding, role identification
Maintenance & Care Tips
Proper care keeps a heavy-duty safety vest ANSI-compliant, visible, and durable. Neglect shortens its lifespan.
1. Cleaning & Washing
Dirt and oil reduce fluorescent brightness and reflectivity.
- Wash cold or warm with mild detergent
- No bleach, fabric softeners, or harsh chemicals
- Hand wash or a gentle machine cycle
- Empty all pockets; close zippers/snaps
- Wash separately or with lightweight items
A dirty vest may lose ANSI compliance even if the tape remains intact.
2. Drying & Heat
Heat damages reflective tape.
- Air dry preferred
- Tumble dry low heat only
- Do not iron reflective or printed areas
- Avoid heaters or direct heat
3. Inspection
Check before use or weekly:
- Fabric tears or fraying
- Loose stitching
- Peeling or dull reflective tape
- Wear at the shoulders, zippers, and pocket seams
Flashlight test: reflective areas should “pop” in low light.
4. Storage
- Hang or store flat
- Don’t crumple in toolboxes or truck beds
- Store away from sunlight and sharp objects
UV exposure fades fluorescent color fastest.
5. Marking & Identification
- Don’t cover reflective or hi-vis areas
- Use heat-transfer or sewn PPE-approved markings
- Avoid solvent-based inks
- Place logos on black or non-critical panels
6. Lifespan & Replacement
Typical replacement guidelines:
- Daily outdoor use: 6–12 months
- Moderate use: 1–2 years
- Occasional use: 2–3 years
Replace immediately if brightness or reflectivity drops.
Frequently Asked Questions (FAQs)
1. What makes a safety vest “heavy duty”?
A heavy-duty safety vest uses tough fabrics (solid twill or 300D–600D Oxford), reinforced stitching/webbing, zipper or snap closures, and multiple load-bearing pockets to withstand rugged work environments.
2. What features should I look for in a heavy-duty safety vest?
Look for a solid front/mesh back, reinforced edges, padded neck, grommets, ANSI/ISEA 107 compliance, and a pocket layout suited to your tools and devices.
3. What’s the difference between a regular safety vest and a surveyor vest?
Regular vests focus on visibility only with minimal pockets.
Surveyor (heavy-duty) vests add specialized tool pockets, including tablet or backpack pockets, and are built for carrying gear.
4. What do ANSI classes mean for safety vests?
- Class 1: Low-risk, off-road work (< 25 mph)
- Class 2: Standard for construction and roadway work (25–50 mph)
- Class 3: Maximum visibility for 50+ mph, night, or low-light conditions
Safety apparel is often treated as a one-time purchase rather than a long-term safety system. Helmets, gloves, high-visibility garments, footwear, and respiratory protection are expected to perform reliably day after day, often in harsh environments. However, without proper care, even the best-designed gear can lose effectiveness far earlier than expected. This guide explains how to correctly inspect, clean, store, repair, and replace safety apparel so it continues to protect workers as intended. By treating PPE maintenance as an ongoing process rather than an afterthought, organizations can reduce risk, control costs, and foster a safer, more consistent work environment.
Why Safety Apparel Maintenance Matters
Safety apparel maintenance has a direct impact on injury prevention, regulatory compliance, and workforce confidence. Protective equipment that is worn, contaminated, or improperly handled may appear functional while offering reduced protection. A structured maintenance program ensures that safety apparel performs as designed throughout its service life.
- Maintained apparel preserves protective properties such as impact resistance, visibility, and chemical barriers.
- Proper upkeep supports regulatory inspections and internal compliance review.
- Routine care reduces premature replacements and lowers total ownership costs.
- Consistent practices reinforce accountability and strengthen safety culture.
Workplace injury data shows that millions of nonfatal injuries occur each year, many of which could be reduced through proper equipment care. Organizations that prioritize maintenance create safer job sites and reduce preventable incidents.
Understanding Manufacturer Guidelines
Every item of safety apparel is engineered with specific materials, treatments, and performance expectations. Manufacturer guidelines define how these materials should be handled to preserve protection. Ignoring these instructions can compromise safety and invalidate certifications.
Key Steps
Following manufacturer guidelines is the foundation of effective PPE maintenance. These instructions are not suggestions. They are based on testing, certifications, and material science that determine whether safety apparel will continue to perform as designed. Skipping or improvising any step can quietly reduce protection, even when damage is not immediately visible.
Review Care Labels and Technical Documentation
Every piece of safety apparel includes a care label or technical manual that specifies how it should be handled. These labels outline approved washing temperatures, drying methods, and whether professional or home processes are permitted. Some garments require industrial laundering due to contamination risks or fabric sensitivity, while others may permit controlled home washing. Ignoring these details can damage fibers, degrade reflective elements, or compromise protective coatings. Reviewing labels before any cleaning or handling decision ensures that workwear cleaning preserves the original performance standards.
Avoid Unauthorized Cleaning and Handling Methods
Using unapproved detergents, solvents, or mechanical processes is a common cause of premature PPE failure. High alkalinity products, excessive agitation, or high heat can weaken fabrics and destroy protective finishes. Even well-intentioned shortcuts, such as using household chemicals to scrub stains, can cause long-term damage. Approved cleaning detergents, controlled wash cycles, and proper pH control are essential to prevent material breakdown. Unauthorized methods may also void warranties or certifications, leaving organizations exposed during inspections or audits.
Identify Expiration Dates and Service Life Limits
Many types of safety apparel have defined service life limits, even if they appear undamaged. Materials can degrade due to UV exposure, environmental conditions, or natural aging. Hard hats, harnesses, and respiratory equipment often include manufacturer dates that determine when they should be replaced. Respecting expiration dates ensures that equipment inspection does not rely solely on visual condition. Understanding lifecycle limits helps organizations plan replacements proactively rather than reacting to failures.
Inspection Procedures: What to Check and How Often
Inspection is the backbone of any effective PPE program. Regular inspections identify early signs of damage or contamination and prevent unsafe gear from remaining in service. Inspection schedules should include both frequent user checks and periodic detailed reviews.
Daily User Inspections
Daily inspections are quick but critical. Before each use, workers should visually and physically check their gear. Tears, cracks, discoloration, loose stitching, and missing components should be noted immediately. Gloves should be flexed to feel for thinning or stiffness. Respirators should be examined for cleanliness and proper sealing. These steps form the foundation of equipment inspection and reduce immediate exposure risks.
Periodic Detailed Inspections
Monthly or quarterly inspections provide a deeper assessment of condition and performance. Trained personnel should conduct and document these inspections. Reflective materials, load-bearing components, fasteners, and closures should be evaluated for wear. Findings should be recorded using a standardized inspection checklist. Documentation allows organizations to track deterioration patterns and supports audit readiness.
Inspection by Apparel Type
Different safety apparel categories require specific inspection criteria. Hard hat care includes inspecting shells for cracks, brittleness, and UV damage, as well as checking suspension systems for wear. High-vis garment care focuses on color fading, reflective tape integrity, and seam durability. Glove maintenance requires checking for punctures, chemical degradation, and loss of dexterity. Respirator cleaning and inspection must confirm valve functionality, filter condition, and hygiene to ensure respiratory protection remains effective.
Cleaning Safety Apparel
Cleaning safety apparel removes contaminants that can weaken materials or pose health risks. However, improper cleaning can shorten the lifespan of garments or compromise protective features. The cleaning method should always align with manufacturer guidance.
Industrial Laundry Services
Professional industrial laundry services are often recommended for heavily soiled or regulated environments. These services use controlled processes to protect garment integrity while removing oils, chemicals, and biological contaminants. Water chemistry, temperature, and mechanical action are carefully managed. Consistent pH control prevents fiber degradation and preserves coatings. Industrial laundering also reduces cross-contamination and provides traceable records.
Home Washing Best Practices
Some safety apparel is approved for home washing, but strict controls are necessary. Home laundering safety begins with separating safety garments from everyday clothing. Washing temperatures must match label instructions, and loads should not be overcrowded. Selecting appropriate cleaning detergents is critical, as overly alkaline products can damage fibers and reflective elements over time.
Stain Removal Techniques
Prompt, appropriate stain-removal methods help preserve garment performance. Sweat buildup often responds to gentle soaking, while oil-based stains may require approved pre-treatment. Paint and beverage stains should be treated before drying to prevent setting. Aggressive scrubbing or the use of unapproved solvents should be avoided, as they can weaken protective fabrics.
Detergent Dosage and pH Importance
Excess detergent can leave residues that attract dirt and reduce breathability. Maintaining proper pH control during washing protects both fibers and treatments. In approved processes, an acid rinse may be used to neutralize residual alkalinity and restore fabric balance. This step is crucial for garments with reflective or water-resistant properties.
Drying, Ironing, and Reactivation of Protective Finishes
Drying methods significantly affect the longevity of safety apparel. Excessive heat can shrink fabrics, distort components, or degrade coatings. Low-heat tumble drying is commonly recommended, while air drying may be preferred for sensitive items. Ironing should only be performed if explicitly permitted. Specific garments rely on controlled heat to reactivate DWRn, restoring water repellency after washing.
Repair Impregnation and Re-impregnation
Not all damage requires immediate replacement. When allowed by manufacturer guidelines, repairs and treatment restoration can safely extend service life.
Minor Repairs
Slight seam separations or fastener replacements may qualify as acceptable safety apparel repair if performed correctly. Repairs must use compatible materials and follow documented procedures. Unauthorized modifications can compromise protection and invalidate certifications.
DWR Reactivation and Impregnation
Water-repellent treatments wear down over time. DWR reactivation may involve heat activation or reapplication using approved spray or wash-in products. Effectiveness should be verified using simple water-beading tests. Proper impregnation restores performance without unnecessary replacement.
Proper Storage Techniques
Proper storage is often overlooked, yet it plays a significant role in preserving the protective performance of safety apparel. Even well-cleaned and carefully inspected gear can degrade quickly if stored incorrectly. Establishing clear storage standards helps prevent unnecessary damage, contamination, and premature replacement.
Clean and Dry Before Storage
All safety apparel should be stored only after it has been thoroughly cleaned and completely dried. Storing garments with sweat, oil, or chemical residue can lead to fabric breakdown, odor buildup, and microbial growth over time. Moisture trapped in fibers weakens materials and can compromise protective coatings. Ensuring items are dry before storage also prevents corrosion of metal components such as buckles, clips, and fasteners. Clean storage conditions are a foundational part of adequate PPE storage and help maintain long-term performance.
Protect From Light, Moisture, and Chemicals
Environmental exposure during storage can silently damage safety apparel. Direct sunlight, especially ultraviolet radiation, accelerates material degradation and color fading, particularly in high-visibility garments and hard hats. Storage areas should be shaded and temperature-controlled where possible. Apparel must also be kept away from sources of moisture, such as damp floors or leaking pipes. Chemicals, fuels, and solvents should never be stored near PPE, as vapors alone can degrade fabrics and elastomers over time.
Use Proper Hanging and Shelving Methods
How apparel is physically stored matters. Hanging garments allows airflow, reduces creasing, and helps preserve garment shape. Heavy items should be supported evenly to avoid stretching. Helmets and hard hats should be placed on shelves or dedicated racks that support their natural shape. Storing helmets upside down or stacked can deform shells and suspension systems, reducing impact protection. Gloves should be stored flat or lightly hung to prevent creasing and stiffness.
Organize for Accessibility and Rotation
Storage systems should support easy access and rotation. Frequently used items should be easy to retrieve without disturbing others, reducing handling damage. Clearly labeled storage areas also help ensure older items are used first and replaced on schedule. Organized PPE storage improves readiness, accountability, and overall equipment longevity.
Replacement Schedules and Record Keeping
Even with excellent care, safety apparel has a finite service life. Clear replacement timelines and accurate records prevent unsafe overuse.
Adhering to Replacement Schedules
Each equipment category has different lifecycle expectations. Hard hat suspensions typically require replacement annually, while shells have defined maximum lifespans. High-visibility garments may need to be replaced within months, depending on wear and washing frequency. Gloves and harnesses follow task-specific timelines. A defined replacement schedule removes guesswork and ensures consistent protection. Industry guidance shows that complex hat suspensions should be replaced every 12 months and shells every five years, reinforcing the importance of lifecycle management.
Documentation Practices
Accurate documentation connects inspections, cleaning, repairs, and replacements into a unified system. Logs support traceability and serve as the basis for a PPE audit. Many programs follow the four Ps framework, addressing people, processes, parts, and performance. Strong records demonstrate due diligence and support continuous improvement.
Frequently Asked Questions
1.What are the five elemental rules for safe maintenance?
Inspect before each use, clean according to manufacturer instructions, store properly, repair or remove from service, and adhere to replacement schedules.
2. What are the 7 basic safety rules?
Know your equipment, follow a regular inspection schedule, document everything, never use damaged gear, train your team, respect expiration dates, and report incidents.
3. What are the 4 Ps of maintenance?
People define roles and responsibilities; processes establish inspection and cleaning procedures; parts address PPE selection and inventory; and performance measures assess program effectiveness.
Resources and Further Reading
Maintaining an effective safety apparel program requires ongoing education and reference to trusted sources. Organizations should regularly review their internal safety policies alongside external standards governing PPE use, inspection, and care. Manufacturer technical manuals provide the most specific guidance for individual products and should be kept accessible to supervisors and safety teams. Regulatory agencies publish updates that clarify expectations around inspections, documentation, and replacement intervals. Training materials, safety bulletins, and supplier resources can also help teams stay aligned with current best practices. Periodic refresher training reinforces correct PPE storage, cleaning, and inspection habits across the workforce. By consulting authoritative resources and keeping maintenance knowledge current, organizations can adapt to changing requirements while maintaining consistent protection standards across all job roles.
Wrapping Up
Safety apparel delivers protection only when it is correctly maintained throughout its lifecycle. Inspection, cleaning, storage, repair, and replacement must work together as a single system rather than isolated tasks. When organizations commit to consistent care, they reduce risk, control costs, and reinforce accountability across their workforce. Strong maintenance programs also support a healthier safety culture and more confident workers. National Safety Gear provides reliable products and practical guidance to help organizations manage safety apparel effectively- get in touch with National Safety Gear to strengthen your PPE program and keep your teams protected every day.
High-visibility workwear plays a crucial role in modern job site safety, particularly in environments where workers operate near moving vehicles, heavy machinery, or in low-light conditions. From roadway construction zones to warehouses, utilities, and industrial facilities, being seen clearly and early can mean the difference between a near miss and a serious incident. As job sites grow more complex and traffic exposure increases, visibility has become a foundational element of workplace protection strategies.
At its core, high-visibility workwear is designed to enhance human recognition through the use of color, contrast, and reflective elements. These garments are not fashion-driven, but function-driven, designed to meet regulated performance standards and address real-world risks. Employers are increasingly relying on safety apparel that complies with recognized PPE standards, while also prioritizing comfort, durability, and job-specific demands. Understanding what qualifies as high-visibility gear and why it matters is essential for anyone responsible for worker safety or purchasing work safety gear.
Definition and Purpose of High-Visibility Workwear
High-visibility workwear refers to garments classified as personal protective equipment intended to make the wearer easily detectable under both daytime and nighttime conditions. This category includes high-visibility clothing, such as vests, shirts, jackets, pants, and accessories, that utilize fluorescent background materials combined with reflective tape or other retroreflective elements. The purpose is to increase visual contrast between the worker and their surroundings, enabling drivers, equipment operators, and coworkers to recognize human presence quickly.
In the United States, most compliant garments are evaluated under ANSI 107, which establishes performance requirements for background material, retroreflective placement, and total coverage. These requirements ensure that garments function consistently across various lighting conditions, weather conditions, and viewing angles. When high-visibility apparel is worn correctly, it allows the human silhouette to be identified from significant distances, even when illuminated only by vehicle headlights.
High-visibility garments are a core part of broader PPE systems. Alongside hard hats, gloves, and footwear, they support hazard mitigation strategies required on regulated job sites. Whether worn as a retroreflective vest over standard clothing or integrated into full outerwear, the goal remains the same- early detection, rapid recognition, and reduced risk of struck-by incidents.
Importance of High-Visibility Workwear on the Job
Visibility is one of the most controllable safety variables on a job site. While hazards such as traffic flow or machine movement may be unavoidable, worker visibility can be significantly improved through the proper selection of personal protective equipment (PPE). High-visibility workwear directly addresses struck-by hazards, which remain one of the significant reasons behind serious injuries and fatalities in construction, road work, and utility operations.
Research shows that a substantial portion of roadway construction worker fatalities result from struck-by incidents involving vehicles or equipment. These events often occur because a worker was not seen in time for a driver or operator to react. High-visibility garments increase detection distance, allowing drivers more time to slow down, steer away, or stop altogether. In controlled testing environments, high-visibility clothing is detectable from well over one thousand feet under optimal conditions, significantly increasing reaction time.
Beyond traffic exposure, visibility also improves coordination between crews operating heavy equipment. Forklift operators, crane operators, and spotters rely on visual cues to maintain safe distances. Wearing compliant construction safety gear improves communication and reduces reliance on verbal warnings alone, especially in noisy environments.
Standards and Regulations
ANSI/ISEA 107 (U.S.)
In the United States, the primary standard governing high-visibility apparel is ANSI/ISEA 107, published by the American National Standards Institute and ISEA. This standard defines the performance requirements for garments designed to enhance worker visibility in hazardous environments. ANSI 107 categorizes garments by both type and class, reflecting the specific uses and environments for which they are intended.
Types indicate the work environment. Type O garments are designed for use in off-road settings, such as warehouses and industrial yards. Type R garments are designed for use in roadway environments where workers are exposed to vehicular traffic. Type P garments are designed for public safety workers and emergency responders. Within each type, garments are further classified as 1, 2, or 3 as per the visible material and retroreflective coverage provided.
Compliance with ANSI 107 is commonly referenced in OSHA hi-vis guidance and enforcement expectations, even though OSHA itself does not publish a standalone hi-vis standard. Many employers treat ANSI 107 compliance as a baseline requirement for work safety gear used near traffic or equipment.
EN ISO 20471 (EU/UK)
Outside the United States, the dominant standard is EN ISO 20471, which applies across the European Union and the United Kingdom. While the goal of the standard is similar to ANSI 107, there are structural differences in how garments are classified and evaluated. EN ISO 20471 primarily focuses on Classes 1 through 3, based on the minimum areas of fluorescent background material and retroreflective striping.
Unlike ANSI 107, EN ISO 20471 does not divide garments by type of work environment. Instead, it emphasizes visibility performance across all industries. The color options approved under EN ISO 20471 are also more limited, with strict requirements for chromaticity and luminance. Employers operating internationally must ensure garments meet the appropriate standard for each region, particularly when sourcing safety apparel across borders.
Classes and Color Options
Class 1 vs Class 2 vs Class 3
The class of a high-visibility garment determines where it should be used and the level of protection it provides. Class 1 garments have the lowest level of visibility and are typically used in low-risk environments with slow-moving traffic or ample separation from vehicles. These garments provide minimal background material and limited reflective coverage.
Class 2 garments significantly increase visibility through greater surface area and additional reflective elements. A typical example is an ANSI Class 2 vest, which is widely used in roadway construction, utility work, and surveying, where traffic speeds are moderate. These garments strike a balance between visibility and mobility, making them suitable for long shifts.
Class 3 garments give maximum visibility and are designed for use in high-risk environments with fast-moving traffic or low-light conditions. Full-sleeve designs, such as ANSI Class 3 jackets, provide 360-degree visibility and enhanced recognition of arm movements. Class 3 apparel is often required for nighttime road work, emergency response, and high-speed traffic zones.
Fluorescent Yellow-Green vs Fluorescent Orange
Color selection is a critical component of visibility performance. Fluorescent workwear relies on colors that convert ultraviolet light into visible light, making them appear brighter during daylight hours. Fluorescent yellow-green is widely used because it provides strong contrast against a variety of backgrounds, including asphalt, concrete, and urban environments.
Fluorescent orange is often preferred in environments where yellow-green may blend into surroundings, such as areas with heavy foliage, snow, or autumn landscapes. Both colors meet ANSI chromaticity requirements when properly manufactured. The choice between them should be driven by environmental contrast rather than preference, ensuring maximum visibility in the specific work setting.
Materials, Features, and Technologies
Modern high-visibility workwear incorporates a wide range of materials and performance features designed to address comfort, durability, and protection against hazards. Background fabrics are typically made from polyester or polyester blends that hold fluorescent dyes effectively while resisting fading. Retroreflective components utilize microprismatic or glass bead technology to redirect light back toward its source, making the wearer visible at night.
Advanced garments now integrate moisture-wicking hi-vis fabrics that help regulate body temperature during physically demanding work. For hazardous environments, FR hi-vis and arc flash hi-vis garments combine flame-resistant properties with visibility requirements, enabling workers to remain protected from both thermal and visibility hazards.
Design innovations, such as the black-bottom design, address practical wear issues by placing darker fabrics in high-soil areas, thereby extending garment lifespan without compromising visibility. These advancements have made high-visibility apparel more wearable across diverse conditions while maintaining compliance with PPE standards.
How to Choose the Right High-Visibility Workwear
Work Environment and Task Risk
Selecting appropriate high-visibility workwear begins with evaluating the work environment and associated risks. Traffic speed, proximity to moving equipment, lighting conditions, and weather exposure all influence the required garment class and type. Roadway crews working near high-speed traffic require higher visibility levels than warehouse staff operating forklifts in controlled settings.
Employers should assess whether additional hazards such as fire, electrical exposure, or rain are present. In these cases, combining visibility with protective features such as rainproof high-visibility materials or flame resistance ensures comprehensive protection without the need for layering incompatible garments.
Fit and Sizing, Including Women ‘s-Specific Cuts
Proper fit ensures safety and comfort. Ill-fitting garments can restrict movement, reduce coverage, or become snag hazards. High-visibility workwear should allow a full range of motion while maintaining the required visible surface areas. The increasing availability of women’s hi-vis apparel addresses long-standing fit issues by offering garments designed for female body proportions, rather than scaled-down men’s sizes.
When garments fit correctly, workers are more likely to wear them consistently and correctly, which improves overall safety outcomes.
Multi-Hazard and Sustainable Options
As safety programs mature, many organizations seek garments that address multiple hazards simultaneously. Multi-hazard apparel combines visibility with protection against fire, arc flash, or chemical exposure. At the same time, interest in sustainable workwear has grown, with manufacturers offering recycled fabrics and longer-lasting designs that reduce the need for replacement without sacrificing performance.
Key High-Visibility Workwear Items
Safety Shirts and T-Shirts
High-visibility shirts form the foundation of many safety programs. Hi-vis shirts are commonly worn in warm conditions or layered under outerwear. They provide essential daytime visibility and often incorporate breathable, lightweight fabrics for comfort during long shifts.
Vests and Pullovers
High visibility vests remain one of the most versatile options due to their ease of use and compatibility with other PPE. Hi-vis pullovers offer an alternative that combines visibility with added warmth and coverage, making them suitable for cooler conditions.
Jackets and Sweatshirts
Outerwear, such as high-visibility jackets and high-visibility sweatshirts, provides full-body visibility and protection from cold or wind. These garments are often required to meet higher visibility standards and are essential for night work or environments with high-speed traffic.
Pants and Overalls
Lower-body visibility is increasingly recognized as crucial for a comprehensive understanding of human movement. Hi-vis pants and hi-vis overalls enhance visibility from all angles, particularly when workers bend or kneel.
Rainwear and Bibs
Wet weather significantly reduces visibility. Rainproof hi-vis jackets and bibs ensure workers remain visible while staying dry, preventing the temptation to remove compliant gear during storms.
Headwear and Accessories
Hi-vis headwear, such as caps and hard hat covers, improves visibility at elevated heights or when workers are partially obscured. Accessories supplement primary garments without replacing required coverage.
Gloves
Hands are often in motion during work tasks. Hi-vis gloves uplift visibility of hand signals and movements, thereby improving communication between workers and equipment operators.
Women’s Hi-Vis Clothing
Dedicated women’s hi-vis lines offer improved fit, comfort, and compliance, ensuring female workers receive the same level of protection without compromise.
Caring for Your High-Visibility Workwear
Proper care helps maintain the performance of high-visibility garments. Washing should be done using mild detergents on gentle cycles to preserve fluorescent dyes and reflective materials. Harsh chemicals, bleach, and fabric softeners can degrade visibility features and reduce the lifespan of garments.
Drying at low temperatures or air drying helps prevent damage to reflective components. Regular inspection is critical. Faded fabric, cracked reflective tape, or damaged seams indicate that a garment may no longer meet performance requirements and should be replaced promptly to maintain safety standards.
Industry Trends
The high-visibility apparel industry continues to evolve in response to workforce diversity, environmental concerns, and jobsite demands. Women ‘s-specific designs have expanded significantly, addressing both comfort and compliance simultaneously. Sustainable materials and longer-lasting constructions are reducing waste and total ownership costs.
Functional design features such as the black-bottom design have become standard in many garments, reflecting real-world wear patterns. The integration of visibility with multi-hazard protection continues to grow, enabling employers to simplify PPE programs without compromising safety performance.
FAQs
1.What Are the Different Classes of High-Visibility Workwear?
High-visibility garments are categorized into Class 1, Class 2, and Class 3 depending on the amount of visible material and the intended risk level. Higher classes provide greater visibility and are used in environments with faster traffic or lower visibility.
2. When does OSHA require High-Visibility Clothing?
High-visibility clothing is required when workers are exposed to vehicular traffic within roadway work zones. OSHA references compliance with recognized standards such as ANSI 107 and aligns with MUTCD safety requirements for visibility.
3. What Is the Difference Between Fluorescent Yellow-Green and Orange?
Fluorescent yellow-green provides strong contrast in most urban and industrial settings, while fluorescent orange is more effective in areas with heavy foliage or snow. Both colors meet performance requirements when manufactured correctly.
4. How Do You Properly Care for High-Visibility Workwear?
Garments should be washed gently with mild detergent, avoiding bleach and fabric softeners. Regular inspections ensure that visibility features remain effective and compliant with regulations.
Conclusion and Next Steps
High-visibility workwear is not optional equipment but a foundational layer of modern jobsite safety. By improving detection distance and recognition, it directly reduces the likelihood of struck-by incidents. It supports safer coordination between workers and equipment. With a significant portion of roadway worker fatalities linked to visibility-related incidents, investing in compliant, well-designed apparel remains one of the most effective risk-reduction strategies available.
Choosing the right combination of garments, including high-visibility vests, jackets, gloves, and rainwear, ensures protection across various seasons and job conditions. For organizations seeking dependable, regulation-ready safety apparel, National Safety Gear offers a broad selection of compliant products designed for real-world performance. Check out the range of high-visibility solutions to outfit your team with workwear that meets today’s standards and tomorrow’s demands.
Hi-visibility shirts with logos are essential for both safety and branding. Whether worn by construction crews, road workers, or any team working in low-light environments, high-visibility shirts with logos play a crucial role in ensuring the safety of workers while promoting a sense of unity and professionalism. These shirts not only meet safety standards but also provide an opportunity for businesses to boost their branding in visible, high-traffic areas. Proper logo placement and printing methods are key to maintaining both safety compliance and durable, high-quality designs. Let’s explore the best practices for adding your logo to fluorescent safety shirts, ensuring that your custom workwear logo stands out while complying with industry regulations.
Why Choose Custom Hi-Vis Shirts with Logo?
Custom workwear logo shirts are a powerful tool for building team identity and reinforcing your brand in the field. When workers wear branded safety apparel, it not only improves their visibility but also promotes a professional, unified look across the team. In environments like construction sites, where safety is the top priority, the right apparel can make a significant difference.
- From a safety perspective, wearing high-visibility shirts with logos is a legal requirement in many industries. These shirts are designed to ensure that workers are easily seen in low-light conditions or around heavy machinery.
- Class 2 high-visibility shirts are typically used for workers who need to be visible in environments with low traffic volume. In contrast, Class 3 high-visibility shirts are required for higher-risk environments, such as highway construction zones.
- These standards help protect employees from struck-by incidents, which are the primary cause of workplace fatalities.
- Moisture-wicking high-visibility materials further enhance comfort and performance, ensuring that workers remain dry and focused on their work, regardless of the weather.
- This is particularly important for those working in physically demanding conditions, where sweat can hinder both visibility and comfort.
- Ultimately, adding a custom safety uniform with a transparent, durable logo serves not only to comply with safety standards but also to foster team spirit and improve brand visibility.
Understanding ANSI/ISEA 107 Compliance
Garment Types & Classes
The ANSI/ISEA 107 standard governs the performance of safety apparel, setting forth requirements for the materials, design, and performance of high-visibility shirts with logos. According to these standards, there are different classifications of hi-vis shirts based on the level of visibility required for different environments. The various garments, including Class 1, Class 2, and Class 3 shirts, are all categorized based on their reflective properties and fluorescent backgrounds.
Class 1 hi-vis shirts are used for workers in environments where traffic speeds are low and visibility is less critical. Workers typically wear Class 2 shirts in environments where the risk of being struck by a vehicle is higher, but traffic speed is moderate. For the most hazardous environments, such as highway work zones or areas with high-speed traffic, Class 3 hi-vis shirts are required. These shirts offer the highest level of visibility, ensuring that workers are seen even in poor lighting conditions or at night.
Size, Placement & Reflective Area Rules
When printing logos on fluorescent safety shirts, it’s essential to be mindful of the logo placement rules set by ANSI. Logos cannot cover the entire reflective area of the shirt, as this would reduce the shirt’s overall visibility. The reflective strips, which make the garment visible in low light, must remain intact and unobstructed.
ANSI regulations also govern the maximum allowable coverage for non-fluorescent logos. For example, the retroreflective logos cannot exceed a certain size to ensure that the garment’s specific reflective properties are maintained. It is also crucial that logos be placed in areas that do not obstruct the retroreflective stripes, which help workers remain visible to drivers and machinery operators. Additionally, reflective tape can be incorporated into the logo design, further improving the visibility of the shirt.
Choosing the Right Fabric & Features
Selecting the right fabric for your custom safety apparel compliance is key to ensuring that the shirt performs as expected.
- The material should be durable enough to withstand the demands of the work environment while also being comfortable enough for all-day wear.
- Polyester is the most commonly used material for high-visibility shirts. Those that include cotton or spandex are also available for added comfort and flexibility.
- For workers in warmer climates or those involved in physically strenuous tasks, moisture-wicking hi-vis shirts are essential. These shirts can pull sweat away from the body, keeping workers cool and dry, which can also help maintain their focus and productivity.
- On the other hand, fabric anti-dye migration techniques are critical for ensuring that the essentials remain crisp and clear over time, even after multiple washes.
- Durability is also an essential factor. A durable method, such as screen printing with high visibility, will ensure that your branding stays intact throughout the garment’s life. This is especially important for high-use apparel, which can experience significant wear and tear.
Logo Printing Methods for Hi-Vis Shirts
Screen Printing
Screen printing hi-vis shirts is a popular and cost-effective method for logo placement. This technique is renowned for its durability, making it suitable for high-wear items, such as workwear apparel. High-wear printing uses ink to create a sharp, vibrant design that adheres well to the fabric, even in harsh conditions. However, for high-visibility shirts with low-visibility, the next level of anti-dye migration can be taken to prolong anti-dye migration, which can cause the logo to fade or bleed into the shirt’s fabric.
Digital Printing
Digital Printing is another excellent option, particularly for designs that feature intricate details or multiple colors. The process utilizes a vinyl film that is applied using heat and pressure. This method allows for full-color detail, making it perfect for complex logos or branding that requires high resolution. This is quickly becoming the preferred method for printing on hi vis apparel due to its ability to work on nearly any type of material. Although more expensive, Reflective vinyl can also be used for a retroreflective logo, ensuring that your branding is visible even in low-light conditions.
Embroidery
While embroidery safety shirts provide a premium look and feel, they are typically more expensive and may not be suitable for lightweight Class 2 hi-vis shirts. The stitching can add bulk to the garment, and intricate designs may be more challenging to execute. However, embroidery can be an excellent option for smaller logos or for creating a more sophisticated, long-lasting logo placement on safety shirts.
Logo Design & Placement Best Practices
When designing a logo for high-visibility shirts, it’s essential to prioritize safety without compromising on aesthetics. High-contrast colors, such as bright yellow or orange, are recommended for the logo, as they stand out well against the fluorescent safety shirts.
In terms of logo placement rules, avoid placing logos over reflective stripes, as this can obscure the garment’s reflective properties and reduce visibility. Instead, consider placing the logo on the upper chest or shoulder area, ensuring that it is visible without interfering with the shirt’s safety features. Balancing branding with compliance is key to producing work zone apparel that meets safety standards while still promoting your company’s identity.
Pricing, Turnaround & Bulk Ordering Tips
When ordering custom safety uniforms, pricing varies depending on the printing method, the quantity of shirts ordered, and the complexity of the design. Bulk hi-vis printing can reduce the per-unit cost, making it more affordable to order in larger quantities. It’s also essential to consider lead time, as customization may take several weeks, depending on the printer’s schedule and the complexity of the design.
Many suppliers offer volume discounts for larger orders, which can help reduce the overall cost of custom workwear logo shirts. It’s worth comparing prices from different suppliers to ensure that you’re getting the best deal for your project.
Caring for Your Custom Hi-Vis Shirts
To ensure that your retroreflective logos and high-visibility shirts with logos maintain their integrity over time, it’s essential to follow proper care instructions. Washing hi-vis shirts in cold water and air-drying them is generally recommended to preserve the reflective material and the brightness of the fluorescent fabric. Avoid using harsh detergents or bleach, as they can damage the fabric and reduce its appearance.
Frequently Asked Questions
What are the rules for putting a logo on a hi-vis shirt?
ANSI ISEA 107 outlines strict guidelines for logo placement and size to maintain visibility and safety. The logo must not obstruct reflective tape or retroreflective areas, and the logo should be of a size that does not compromise the garment’s reflective properties.
Are hi-vis shirts a legal requirement?
Yes, OSHA and MUTCD regulations mandate the use of Class 2 hi-vis shirts in certain work zones, particularly for workers in environments with moderate traffic. For high-risk areas, Class 3 hi-vis shirts are required.
Wrapping Up
Custom high-visibility shirts with logos are essential for both safety and branding in hazardous work environments. By understanding ANSI ISEA 107 compliance and selecting the right fabric, logo placement, and printing method, you can ensure that your workers remain visible while promoting your brand. Whether you choose screen printing, heat transfer vinyl, high-visibility (hi-vis) materials, or embroidery for safety shirts, each method has its advantages.
For high-quality custom safety uniforms, bulk orders, and expert advice on durable logo printing, turn to National Safety Gear. We offer a wide range of work zone apparel that meets safety standards while promoting your brand.
Summer shifts can turn a normal jobsite into a stricter test of focus and stamina. Heat speeds up fatigue, sweat reduces grip, glare makes it harder to read signals, and dry conditions can push dust into work zones for hours. In that environment, safety gear for construction must protect against real hazards while remaining wearable throughout long shifts. This guide covers core construction PPE, newer innovative PPE, and warm-weather add-ons that help crews stay cooler and see clearly. You will also acquire practical habits for PPE inspection and maintenance, ensuring your gear functions properly when it matters most, every day.
Why Safety Gear Matters in Construction
Construction combines overhead work, moving equipment, sharp materials, loud tools, power sources, and time pressure in one place. That is why personal protective equipment is not a formality.
- It reduces injury severity when something goes wrong and, just as important, it helps workers move with more confidence and control.
- The risk level is not theoretical. One in five U.S. worker deaths occurs in construction, with 1,069 fatalities in 2022. Hot weather can raise the chance of a lapse because people get tired sooner and “quick shortcuts” feel easier to justify.
- OSHA’s “Fatal Four” categories reveal where prevention yields the most significant benefits. Falls, struck-by incidents, electrocution, and caught-in or between events account for 57.7% of construction deaths.
- Those causes directly map to everyday choices regarding head protection, visibility, traffic control, and working at height. When equipment is comfortable and well-fitted, crews wear it.
- When it is uncomfortable, scratched, or worn out, workers adjust it or remove it. That is why a strong safety culture is inseparable from the selection, training, and daily habits of PPE.
OSHA Requirements and Standards for PPE
Construction PPE rules are anchored in OSHA 29 CFR 1926. In practical terms, employers must identify hazards, provide workers with appropriate personal protective equipment, train them on its correct use and limitations, and enforce consistent wear. Workers must use the gear properly and report damage, poor fit, or missing items.
Absolute compliance is not only about having PPE on site. It is about choosing the right gear for the task, ensuring it fits, and keeping it in usable condition. Standards also guide what you buy. High-visibility apparel is labeled by class, including ANSI Class II, which is commonly used when workers are exposed to traffic or equipment movement and need higher conspicuity. Eye and face protection should match the risk of flying debris, dust, and splashes. Respiratory gear must match the hazard and be stored and maintained to ensure it still seals and filters properly.
Supervisors should also document training and verify that PPE is used as intended. This includes ensuring replacements are available, correcting improper wear promptly, and updating selections when site conditions change. When PPE programs are treated as a living system rather than a one-time purchase, crews are more likely to buy in and wear their gear consistently.
Top 10 Essential PPE for Construction Workers
Head Protection- Hard Hats
Hard hats protect against falling objects and head impacts in tight work areas. Select the appropriate type and class for job hazards, including electrical exposure where applicable. Fit is a safety feature. A helmet should sit level, feel stable when you look up or bend, and stay secure with the suspension adjusted correctly. Store helmets out of direct sunlight, keep sweatbands clean, and replace headgear after a significant impact or when the shell or suspension shows signs of wear.
Eye and Face Protection
Most job sites need eye protection by default. Safety glasses are suitable for everyday tasks such as drilling, cutting, fastening, and navigating through active zones. When dust is heavy, or particles can slip around side shields, safety goggles provide a tighter seal. For grinding, cutting, and specific splash hazards, a face shield provides broader coverage, and it is most protective when paired with safety glasses underneath. Summer glare and fogging make lens care essential, and an emergency eyewash option should be readily accessible wherever dust, concrete, or chemicals are present.
Hearing Protection
Hearing damage builds up quietly. Hearing protection should match the task and the frequency of movement between zones. Earplugs are low profile under other gear. Earmuffs are quick to put on and remove, and can be helpful for intermittent noise. In the summer, heat can make earmuffs uncomfortable, so choose models with a good seal and tolerable pressure. Additionally, train crews on the correct insertion of plugs to ensure adequate protection.
Respiratory Protection
Dry weather can increase airborne dust and make exposure feel “normal.” Cutting, drilling, grinding, demolition, and cleanup can all require the use of respirators, depending on the material and task. For concrete and masonry work, controls and procedures for silica dust protection may be necessary, even when using wet methods and vacuuming. Summer storage matters because seals deform and filters clog when respirators are tossed into dirty boxes. Keep respirators clean, protected, and easily accessible so workers do not skip them when pace and heat rise simultaneously.
Hand Protection
Hands face sharp edges, abrasion, pinch points, wet cement, and chemicals. Safety gloves should match the work, not the purchasing default. Leather helps with abrasion and rough handling. Cut-resistant gloves are a better choice around sharp sheet goods, metal edges, and tasks adjacent to blades, as they reduce laceration risk without compromising grip. For chemical contact, select glove materials that are compatible with the substance and pair them with the appropriate clothing protection when a splash risk exists.
Foot Protection
Foot hazards include drops, rolling loads, punctures, and slips. Supportive safety boots protect against impact and compression while stabilizing movement on uneven ground. Many crews prefer composite toe boots in hot weather because they are often lighter in weight. Summer also changes traction because fine dust can reduce grip on hard surfaces. Inspect the tread, replace worn soles, and keep boots dry to ensure workers maintain a steady footing.
High-Visibility Clothing
Visibility reduces close calls around trucks, lift zones, and equipment corridors. High-visibility vests and high-vis shirts help operators spot workers more easily and judge distances more accurately. In many active zones, ANSI Class II apparel is a common baseline. Summer tolerance matters, so choose high-visibility pieces in breathable fabric that workers can wear through peak heat without having to remove them.
Fall Protection
Working at height demands real fall protection planning, not improvisation. The system includes a properly fitted harness, a compatible lanyard, and a verified anchor point that can handle expected loads. It also provides clearance planning, swing-fall reduction, and rescue steps. Daily checks are essential because webbing and hardware degrade with sun, sweat, and grit, and any shock-loaded component must be removed from service.
Protective Clothing
Protective apparel can prevent abrasion, contamination, burns, and chemical contact. Coveralls help keep clothing from snagging and protect skin during dirty work. Some tasks require specialized layers, including a chemical-resistant suit for splash risk. For sun exposure, UV-protective clothing reduces burns while remaining lighter than many heavy layers. Match protection to the hazard and rotate tasks when heavy gear is required for extended periods.
Knee Pads
Repeated kneeling on concrete and decking can cause joint damage over time. Knee pads reduce pressure and help workers maintain a safer posture during floor-level tasks. Fit and cleanliness matter in summer because sweat can cause slipping and irritation. When knee protection stays in place and feels stable, workers wear it consistently, reducing long-term wear on the body.
Beyond Basic PPE
Emerging technology is meant to reduce blind spots, not replace training. The best innovative PPE options keep programs simple, focus on meaningful alerts, and reinforce safe decisions that have already been taught on-site.
Smart Hard Hats
A bright hard hat can add impact sensing, motion tracking, and alerting features that help supervisors respond when a worker may be injured or disoriented. Some systems add location tools for large sites. Innovative features only help when the helmet fits well, is worn consistently, and is charged and stored correctly.
Connected Safety Vests
A connected vest can provide proximity alerts around moving equipment and blind corners. In high-traffic zones, it can support forklift safety by warning operators and pedestrians when distances close too quickly. Alerts should be tuned to the site so they stay useful and do not become constant noise.
Biometric Sensors
Heat and fatigue develop quietly. Wearables that monitor biometric sensors, such as heart rate and temperature trends, can support early intervention by recommending water, rest, shade, or task rotation. Used effectively, they enhance heat stress prevention, especially for new hires or crews working extended periods in direct sunlight.
Seasonal Considerations
Summer-specific planning is about keeping PPE wearable and practical. Start with airflow and sweat management. Base layers and high-visibility shirts made from breathable fabric reduce overheating and help prevent eye protection fogging. For extreme heat, a cooling vest can help reduce the heat load during peak hours, especially when workers must wear heavy harnesses or thick protective layers. Sun exposure also requires a plan, and UV-protective clothing helps reduce burns and fatigue during long shifts.
Hydration should be built into the workflow. A hydration pack makes it easier to sip water consistently when workers are away from coolers, moving between tasks, or working at height. Pair hydration with planned shade breaks and clear escalation steps when a worker exhibits signs of heat illness. A simple rotation plan that shifts the most demanding tasks away from the hottest window can also reduce mistakes and keep the crew steadier. Finally, dry conditions can increase airborne dust, so reinforce the correct use of respirators when tasks generate heavy particulate exposure.
How to Choose and Maintain Your Construction Safety Gear
Key Selection Factors
Strong choices are guided by three filters- durability, comfort, and compliance. If anyone fails to wear the gear consistently, it will not protect as expected. Fit is part of safety. Boots that pinch distract workers. Gloves that slide reduce grip. Harnesses that rub get loosened. Selection should also reflect job roles, as different tasks require varying levels of dexterity, coverage, and heat tolerance.
Inspection and Maintenance
Daily PPE inspection should be quick and specific. Check helmets for cracks and suspension wear. Check lenses and frames for damage that reduces visibility. Confirm that earplugs are clean and stored correctly, and that the earmuff cushions still seal. For harnesses, inspect webbing, stitching, and hardware, and confirm labels and service life information are readable.
Then follow through with PPE maintenance to keep the gear usable, clean eyewear with proper wipes. Wash high-vis garments as directed so reflective areas remain effective. Dry your boots thoroughly and replace worn soles before traction becomes a risk. Store respirators in clean containers to prevent seal deformation and filter contamination. Easy access to replacements prevents crews from “making do” with damaged PPE.
Storage Best Practices
Heat, sunlight, dust, and moisture can deteriorate PPE more quickly than most people expect. Store helmets out of direct sun, protect eyewear from scratches, keep respirators sealed and clean, and hang harnesses or lay them flat to avoid kinks. Storage should also be fast and obvious. If workers have to search for PPE, they start work without it. A clean, labeled, accessible system supports consistent use.
Implementing a Strong Safety Culture on Site
A strong safety culture is built through daily coaching and consistent response. Workers should know PPE is expected, hazards must be reported, and fixes happen quickly. Supervisors should model the standard, correct shortcuts early, and keep safety talks tied to actual tasks.
Short, practical site safety training sessions work best. Teach correct fitting and use, how to spot damage, and what to do when conditions change. Include traffic rules, spotter expectations, and pedestrian lanes to support forklift safety around moving equipment. Encourage hazard reporting without blame, because near misses are valuable information. When reports lead to quick corrections, participation grows and the system improves, which strengthens safety management across the site.
Emergency readiness supports faster response. Keep a stocked first aid kit accessible and checked regularly. Place emergency eyewash where dust, concrete, or chemical tasks occur. For summer, make heat response steps clear so workers know when to stop, cool down, and escalate concerns.
Questions to be Answered
What are the 10 PPE used in construction?
The core set of construction PPE covers head, eyes, hearing, breathing, hands, feet, visibility, fall hazards, full-body protection, and knee support. That typically includes hard hats, safety glasses, hearing protection, respirators, safety gloves, safety boots, high-visibility vests, fall protection harness systems, protective clothing such as coveralls or a chemical-resistant suit when required, and knee pads for kneeling tasks. Many sites also add supportive items such as a properly stocked first aid kit and accessible wash stations, because fast response can limit the severity of injuries.
What is the 20-20-20 rule in construction safety?
The 20-20-20 rule is commonly linked to screen-related eye strain, not jobsite construction safety. On a construction site, the better focus is on hazards that drive real outcomes, especially the “Fatal Four,” consistent fall planning and tie-off practices, and clear equipment and pedestrian rules. The practical message is to use task-specific controls and training rather than borrowing a rule designed for office environments.
What are the 7 basic safety rules?
The universal rules are straightforward. Wear task-appropriate personal protective equipment. Stay aware of surroundings, especially around moving equipment. Keep the worksite orderly. Follow established procedures instead of improvising under pressure. Inspect tools and PPE using daily PPE inspection habits. Avoid impairment and fatigue. Report hazards and near misses through clear hazard reporting so issues get corrected before someone is hurt.
Conclusion
Summer does not reduce jobsite hazards, it amplifies them. The right summer construction gear keeps protection wearable when heat, glare, and dust make shortcuts feel tempting. Start with the essentials, support them with consistent checks and simple care routines, and reinforce the habits that keep PPE on the body instead of on a hook. When PPE inspection and PPE maintenance become automatic, protection stays reliable through the whole season.
If you are equipping a crew or refreshing a program, National Safety Gear is a strong place to source dependable safety gear for construction and construction PPE, from everyday essentials to select smart PPE options that support safer decisions on site.